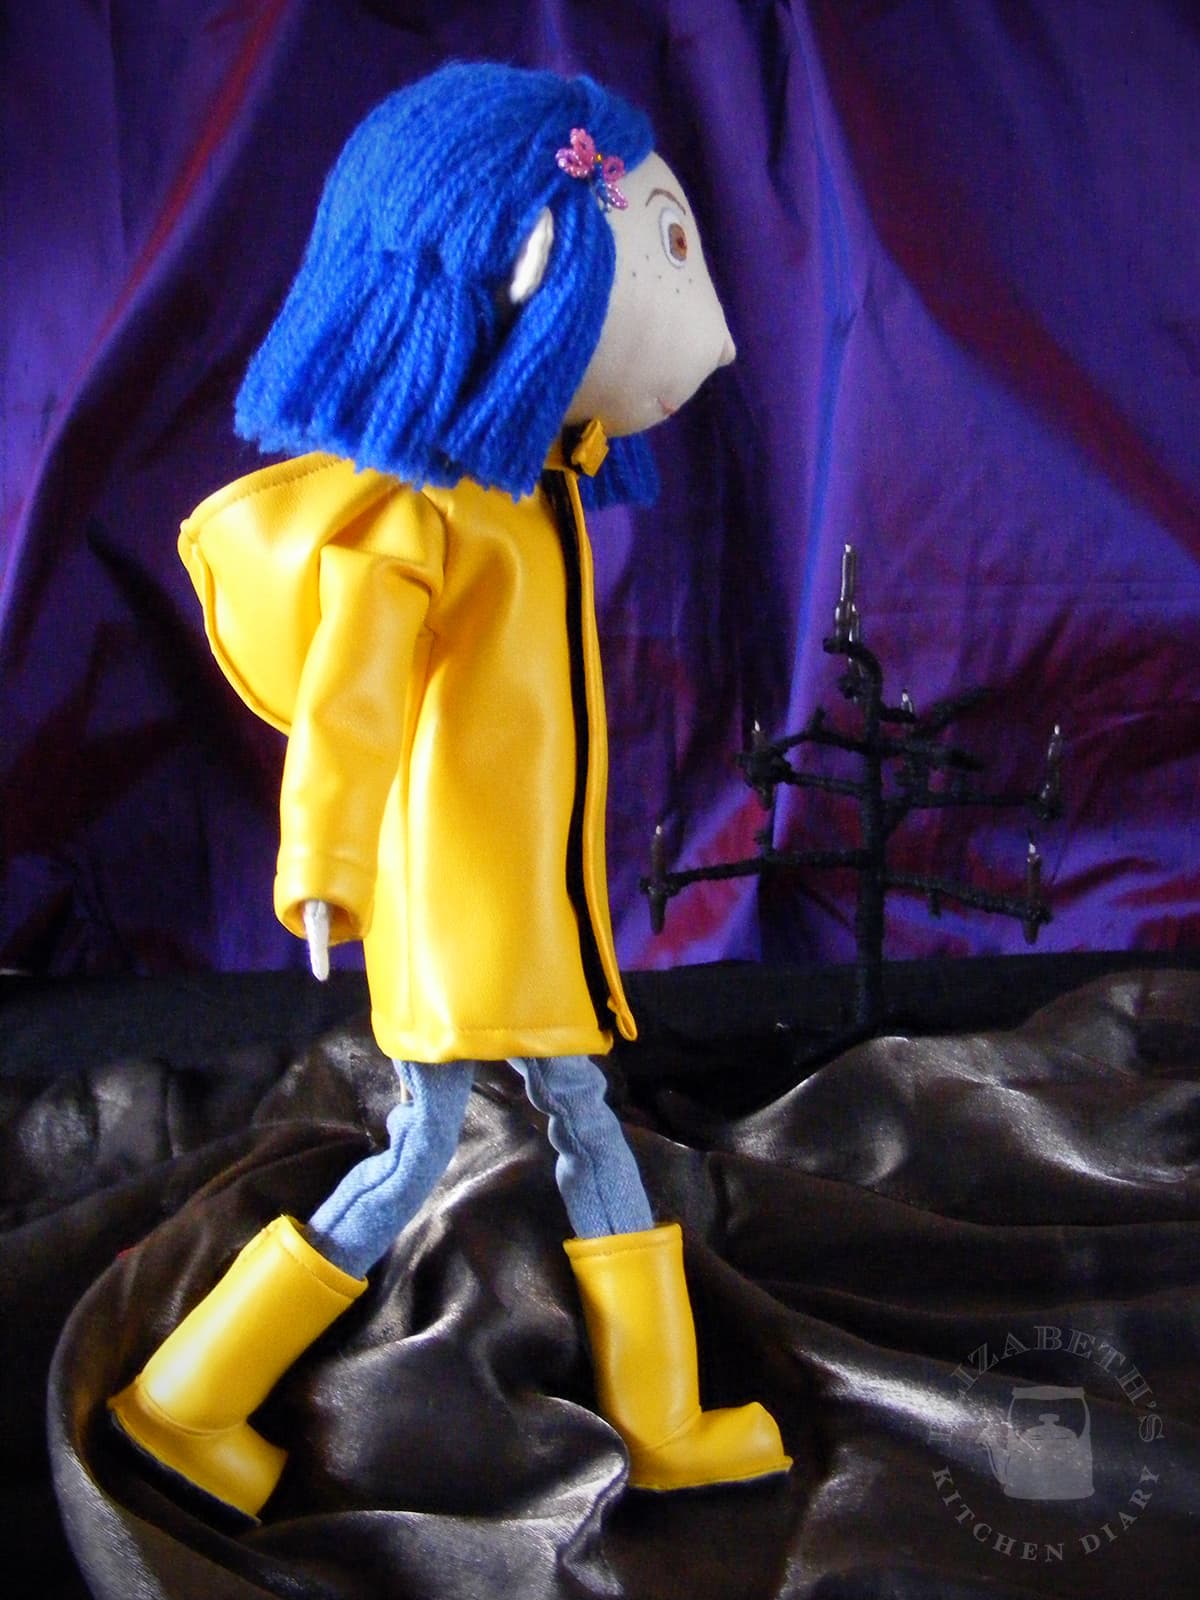
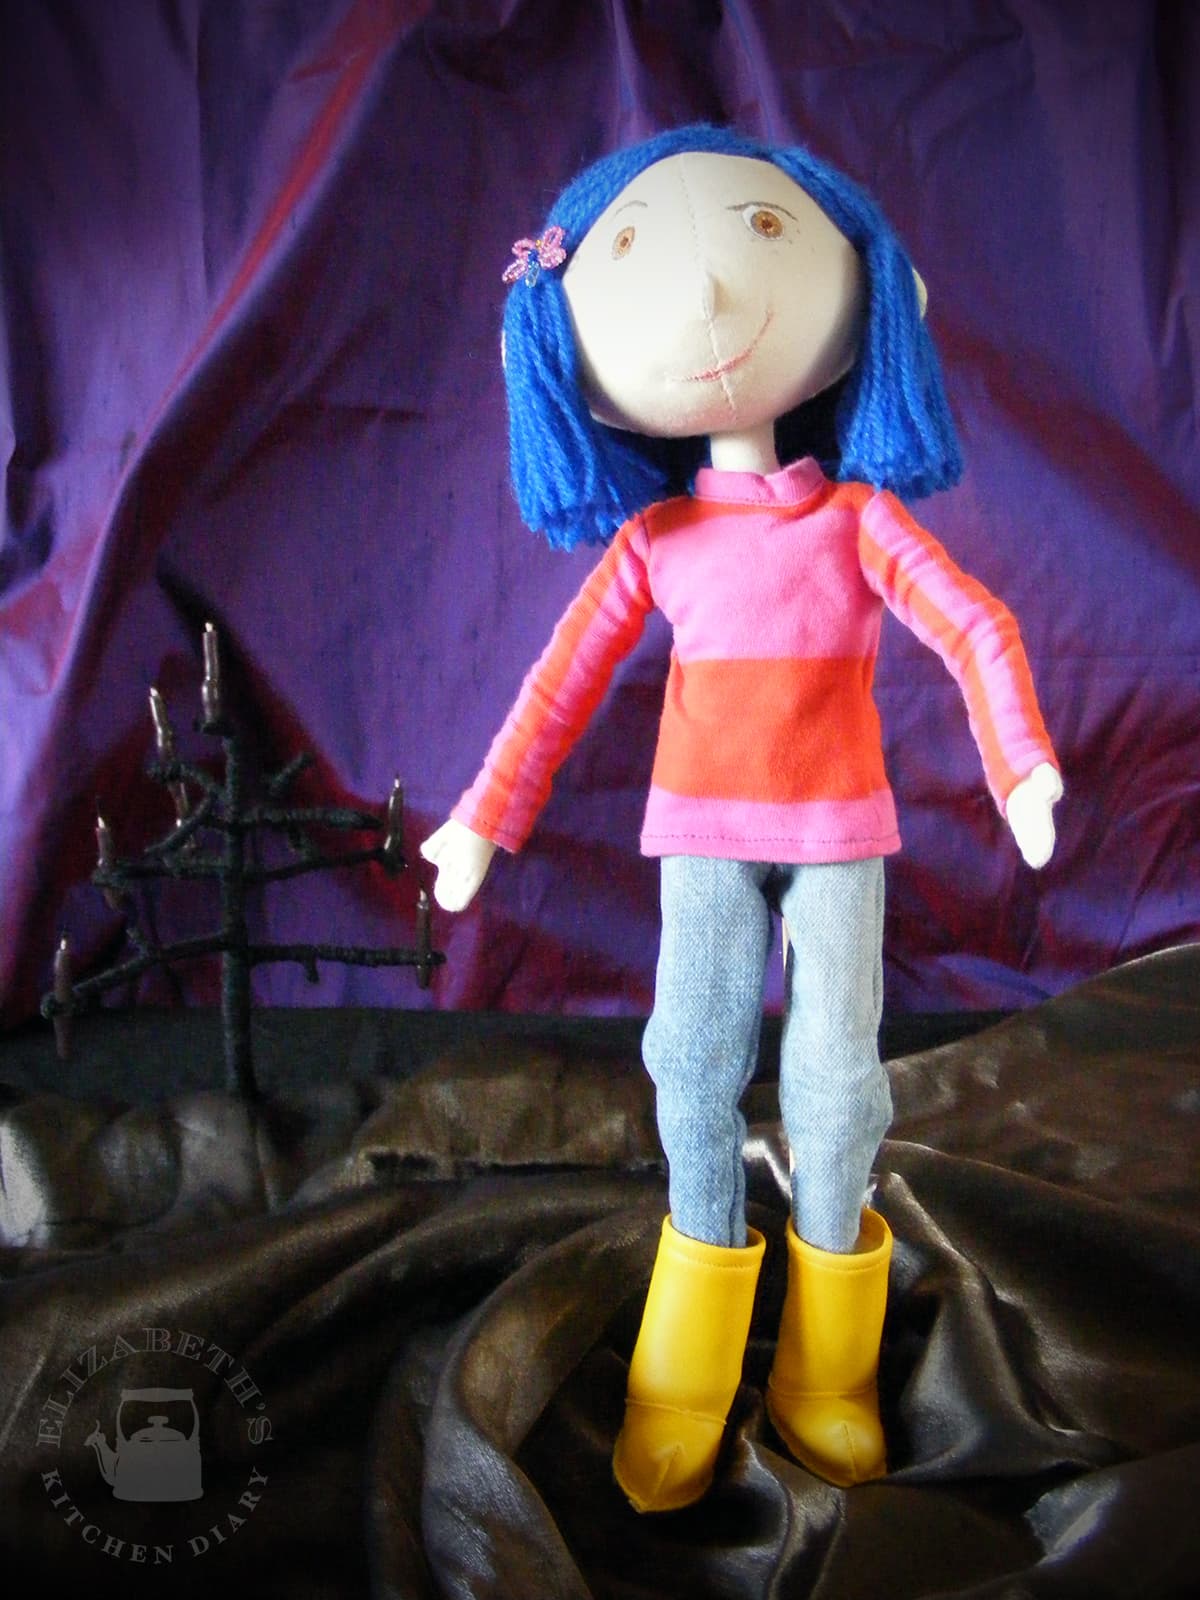
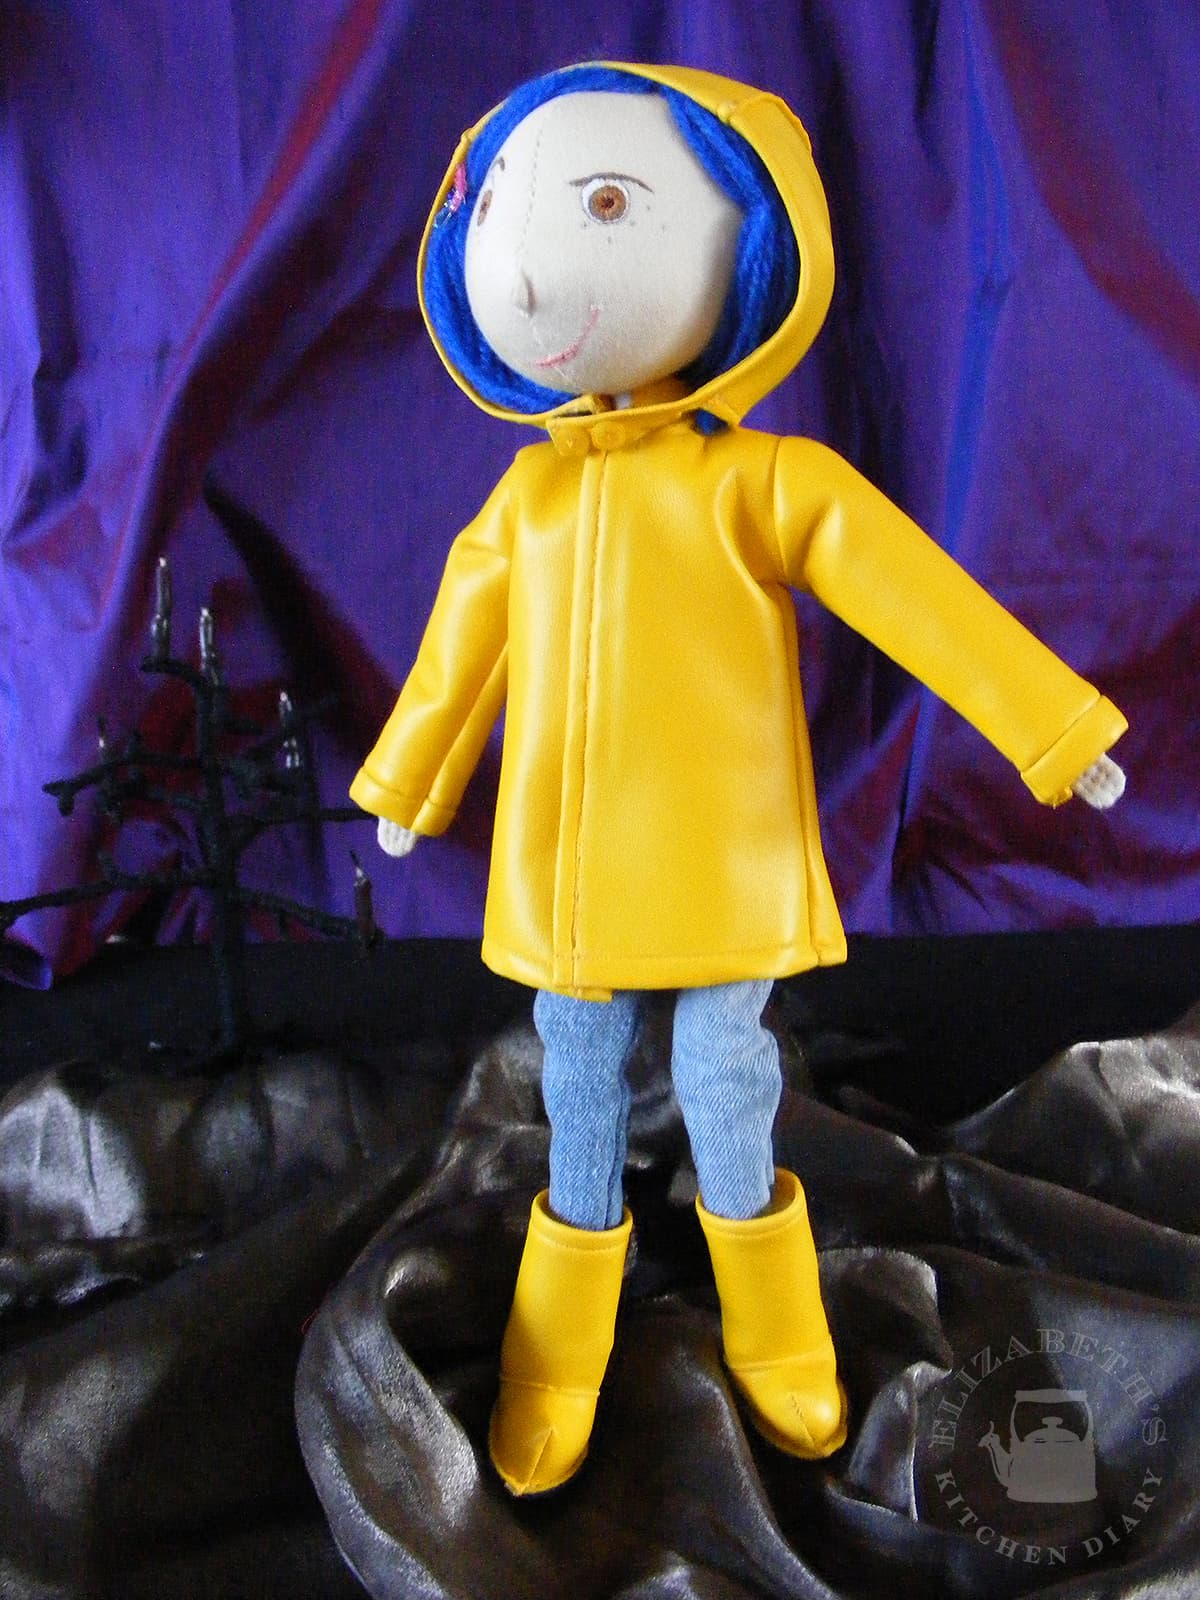
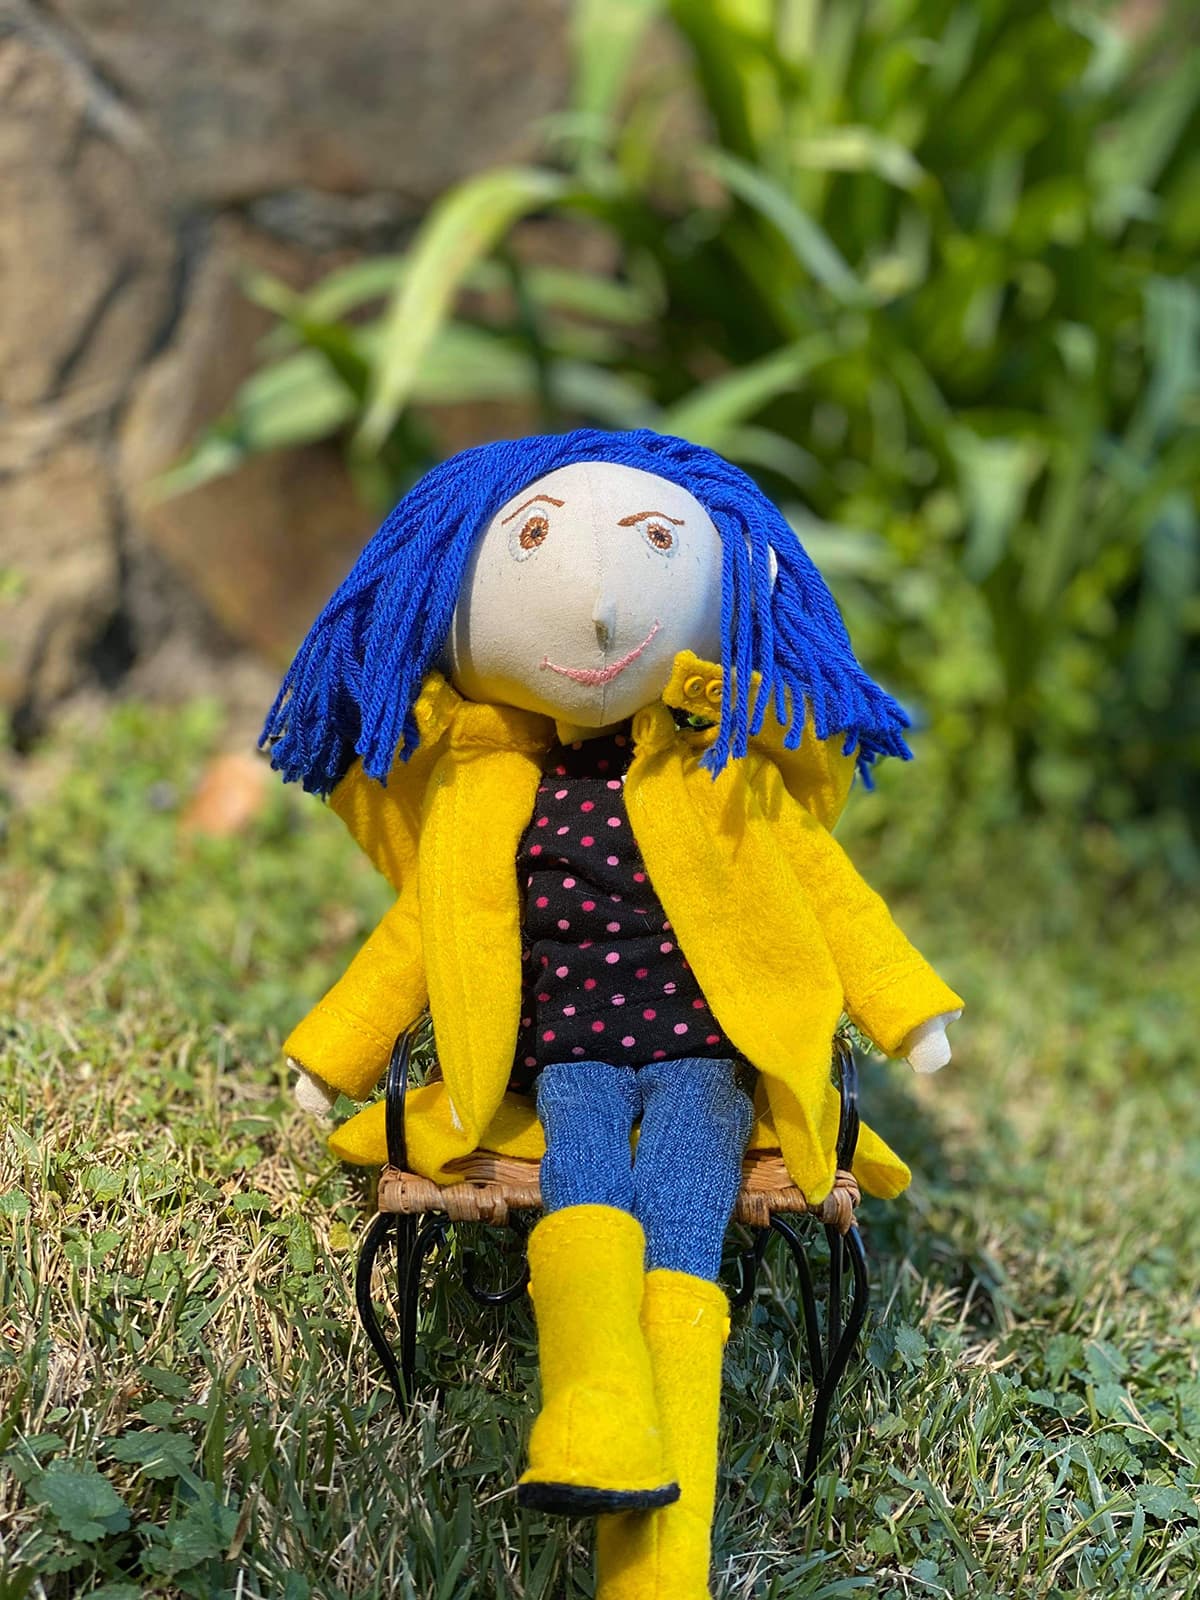
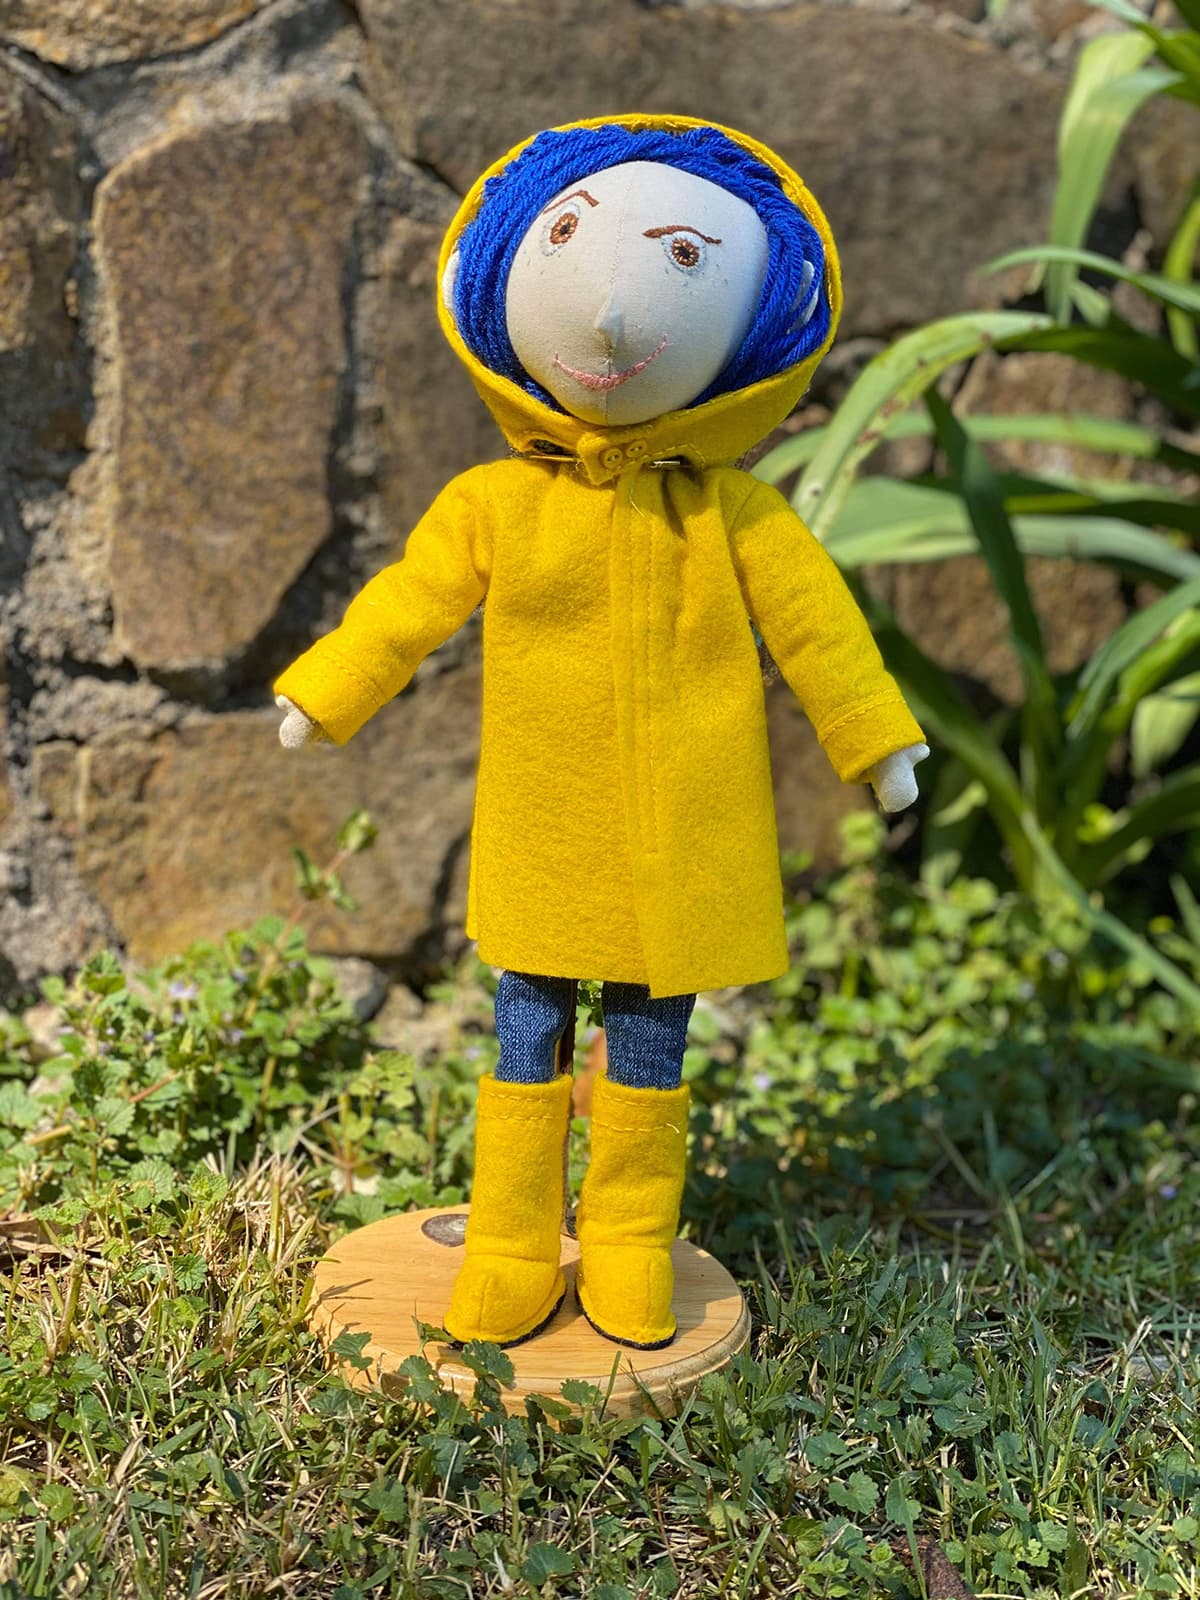
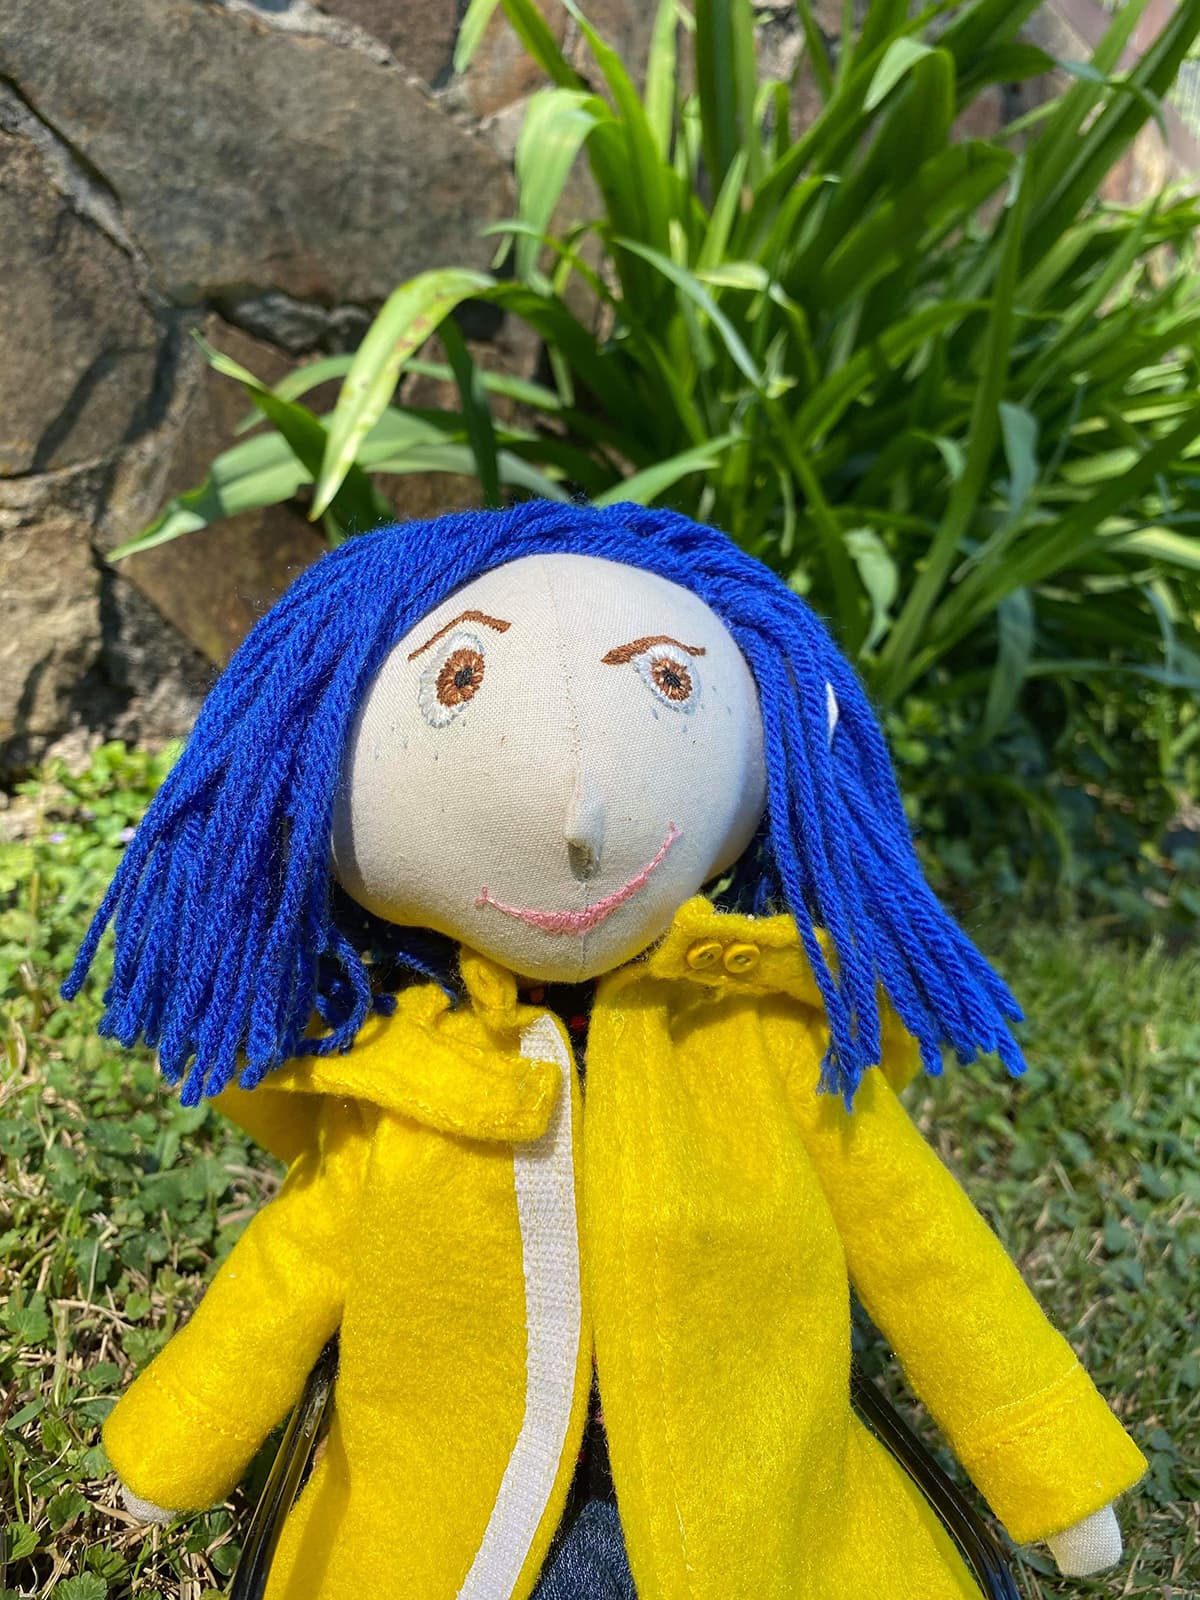
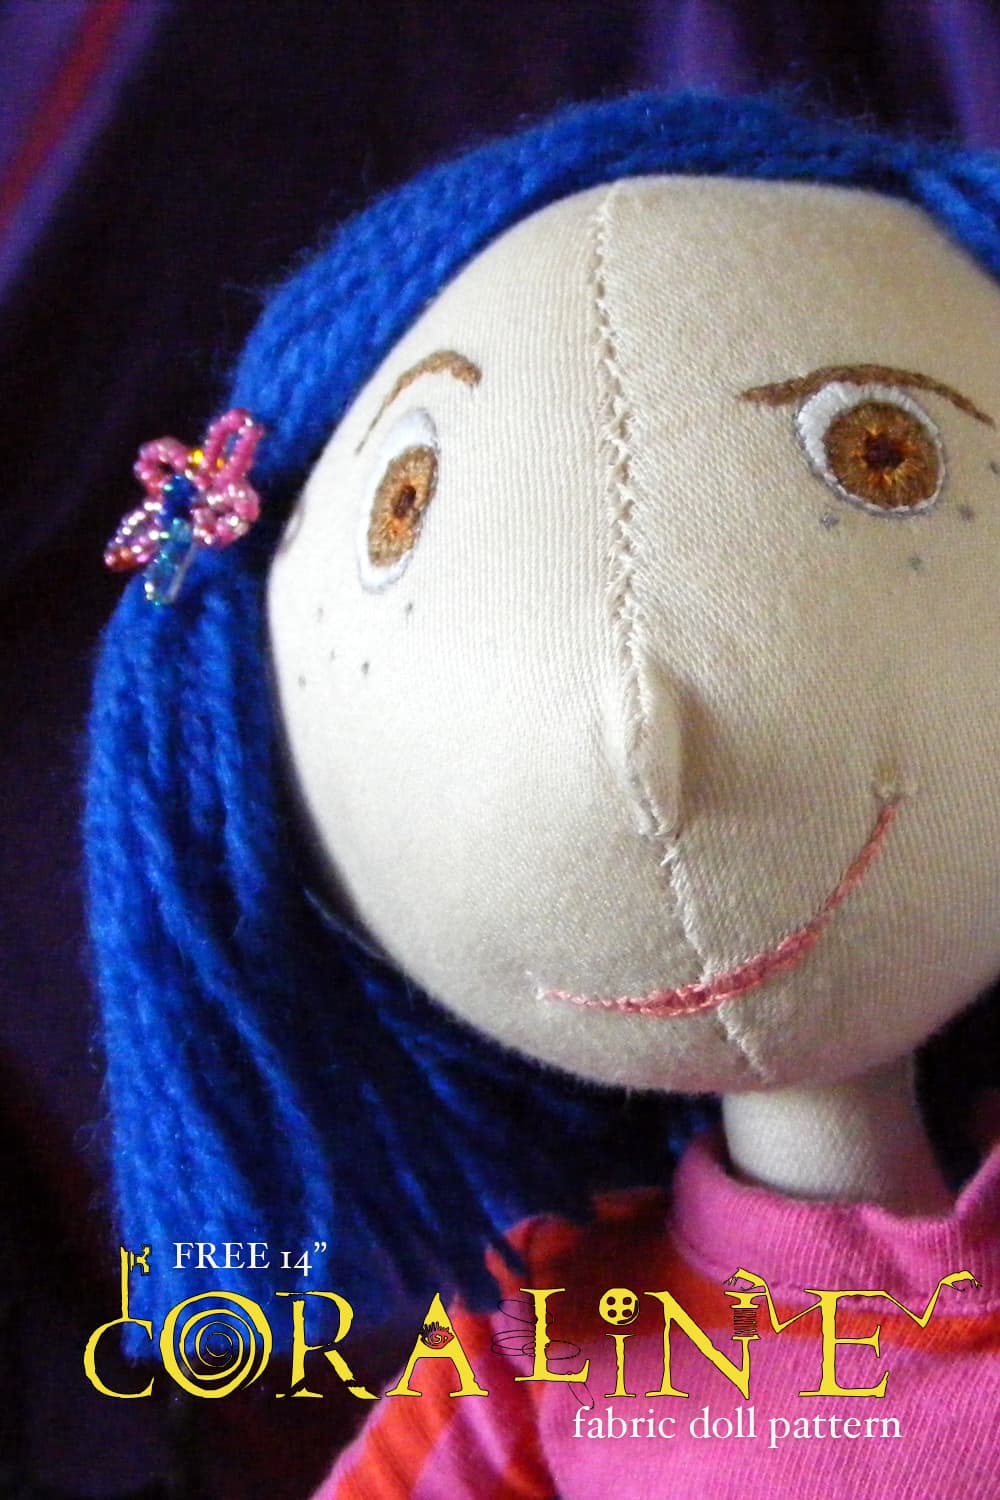
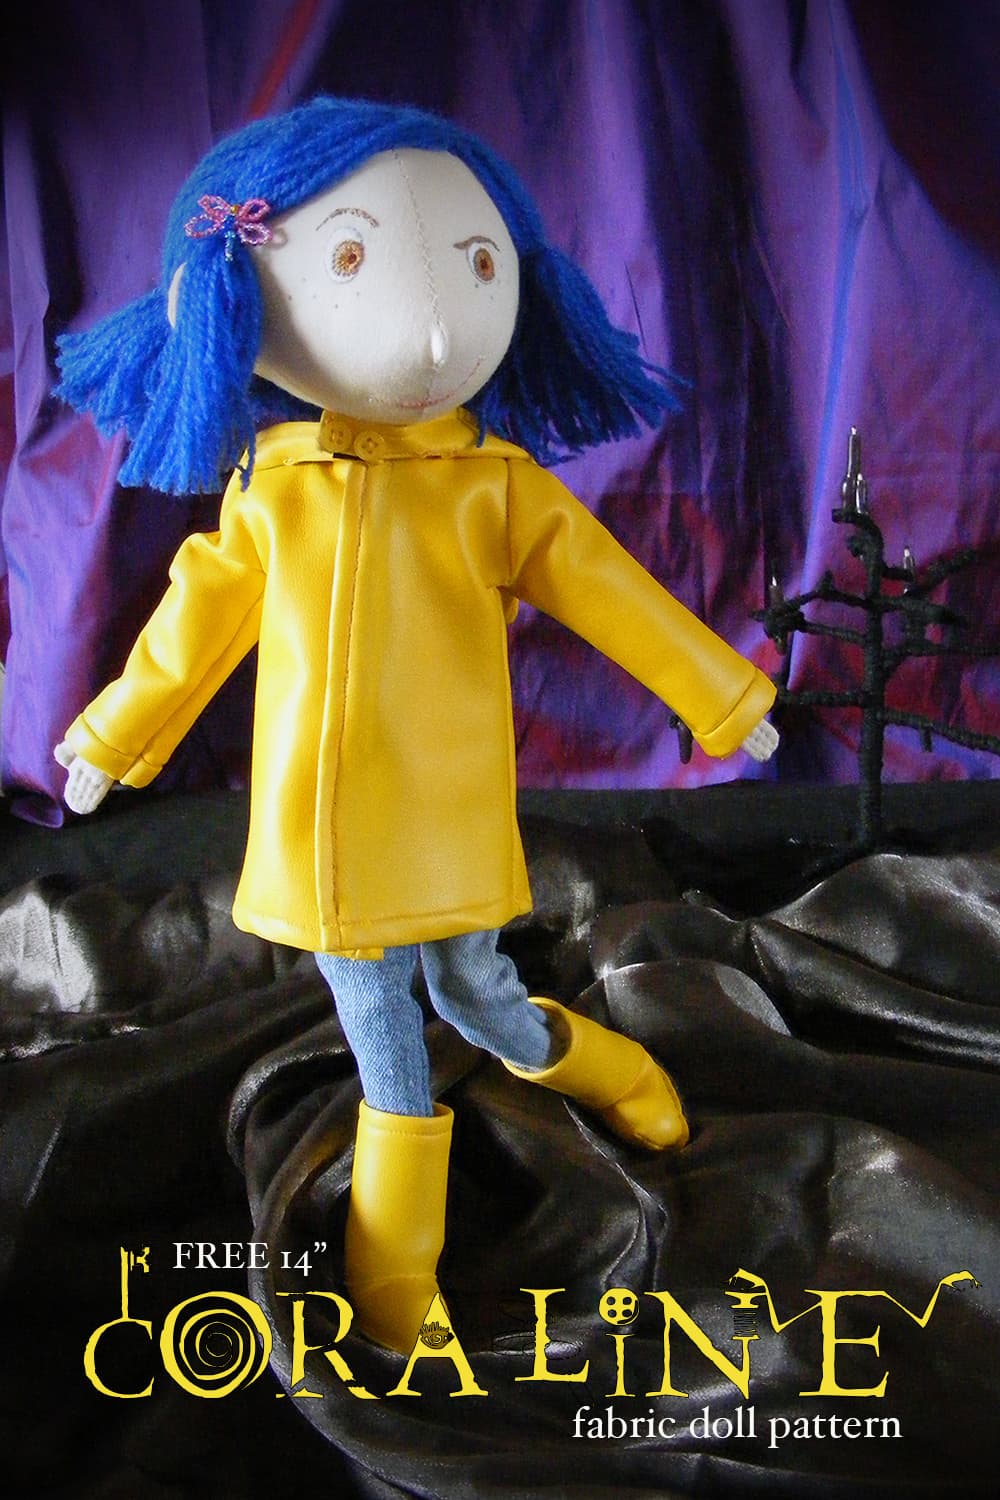
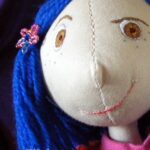
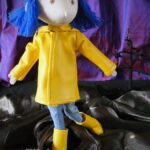
This FREE printable Coraline doll pattern contains everything you need to make your own 14-inch high fabric Coraline doll complete with blue hair, cheeky grin, dragonfly clip, yellow raincoat and boots.

Table of Contents[Hide][Show]
- The daughter of a doll maker
- Who is Coraline?
- Coraline doll DIY
- Second blog anniversary
- Download the FREE Coraline doll pattern
- DIY Coraline Dolls made by you!
- Tips for making this DIY Coraline Doll – by the sewers who have made it!
- FREE 14″ Coraline Doll Pattern – step by step instructions
- Pin this DIY Coraline Doll Pattern for later
- Other Coraline posts you might like (and a cat one)
The daughter of a doll maker
Among her numerous skills and talents, my mother turned her hand to doll making when I was a little girl growing up in rural east-coast Canada.
I used to watch her diligently embroider faces, sew together body parts and use polyester fibre fill stuffing to bring them to life.
I’d grab any scraps of coloured fabric that used to fall off her ironing board as she cut and sewed, and I would design and sew clothes for my own dolls.
Through observation, I learned a few dollmaking tips and techniques along the way.
I helped her make a few dolls too as I got older. I’d wrap wool around knitting needles to make tight curls, and I designed and sewed petticoats, pinafores, dresses and felt slippers.
Over the years I’ve made a few dolls for my own daughter, but this one, I have to say, is the best.
Who is Coraline?
Coraline Jones is the main character in the book Coraline, written in 2002 by Carnegie Medal Winning author Neil Gaiman.
She is a feisty, curious child who notices something isn’t quite right in the new home she and her parents have just moved into.
Coraline is transported to another world when exploring behind an old door in the drawing-room. She must use her wit and guile to defeat the Other Mother, save the day return to the real world.
Coraline is a thrillingly sinister modern classic and it’s one of our family favourites.
Coraline doll DIY
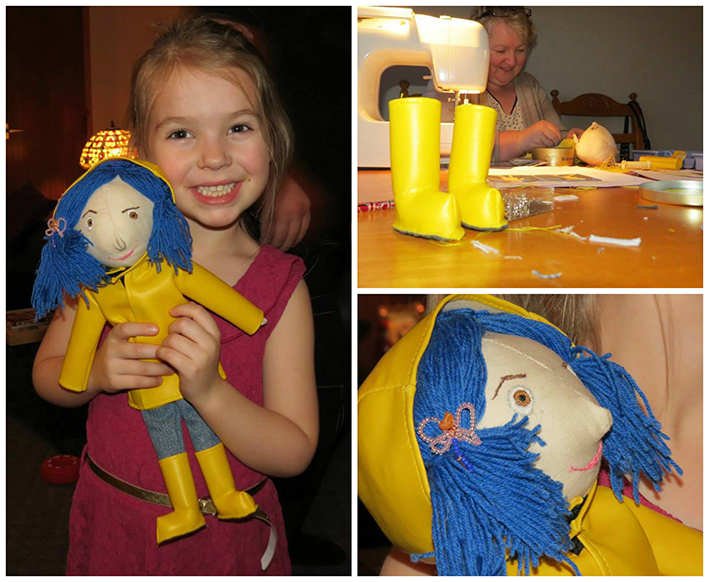
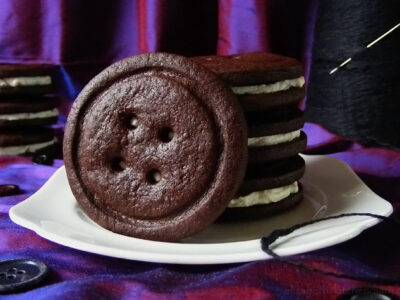
I designed this Coraline doll for my daughter’s 7th birthday to accompany a Coraline themed birthday cake and Oreo Button cookies.
She was absolutely thrilled with her doll made from recycled or second-hand materials from the local charity shop.

Our local charity shop is a treasure trove. It’s spooky how I can think about something and it will appear in the shop sometime in the near future.
For example, both the blue wool and the yellow vinyl fabric (2 metres of it!) came from the charity shop when I headed there deliberately looking for it.
Cost?
I paid £2.50 to make this doll.
The majority of the materials for this Coraline doll pattern were upcycled.
The pink top is my daughter’s toddler dress that had a hole in it; the trousers are my youngest’s jeans, long since outgrown and with tatty ripped legs.
The flesh coloured fabric has been in my fabric bag for years, scraps of things made long ago.
Julia, a crafting friend of mine, gave me the beads. The coloured threads always appear in my Christmas stocking every year.
Even the doll filling came from the charity shop. It was a £1 bag I bought about 5 years ago which is still mostly full!
The dowel rod was leftover from some project in the past and the pattern is 100% out of my head.
It took a few practise goes with scrap fabric and some tweaking and it’s still not perfect. It’s not a bad attempt, I think!
Second blog anniversary
This end of this month sees the second blog anniversary of Elizabeth’s Kitchen Diary. My goodness, what changes there have been over the last two years.
What started as a private online storage place for recipes and photos has evolved a life of its very own!
I never would have thought I would end up having regular readers of my own. Thank you, all you lovely folk, for your supporting comments and words of encouragement.
I have met so many wonderful people over the last two years through the blogging medium; people whom I likely never would have crossed paths with otherwise. You are all fantastic!
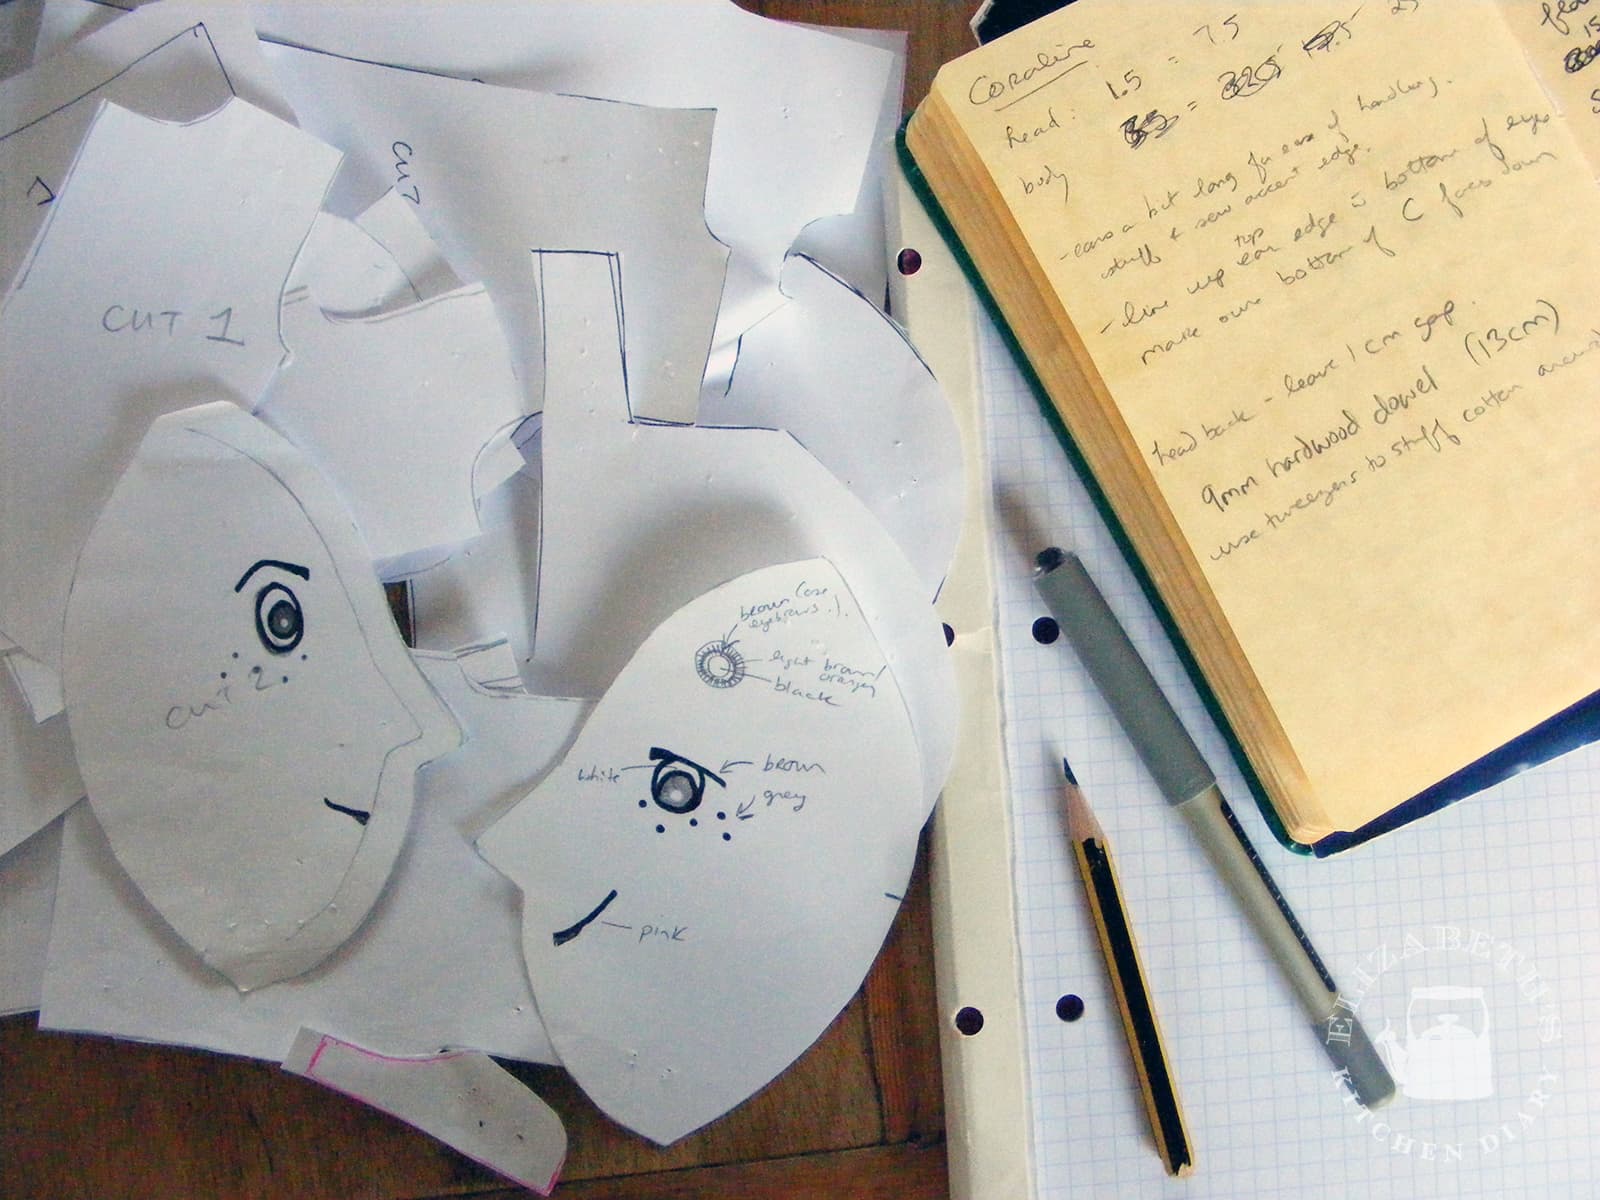
So, as a blog anniversary gift, I transcribed the scraps of patterns I designed into pdf form for you!
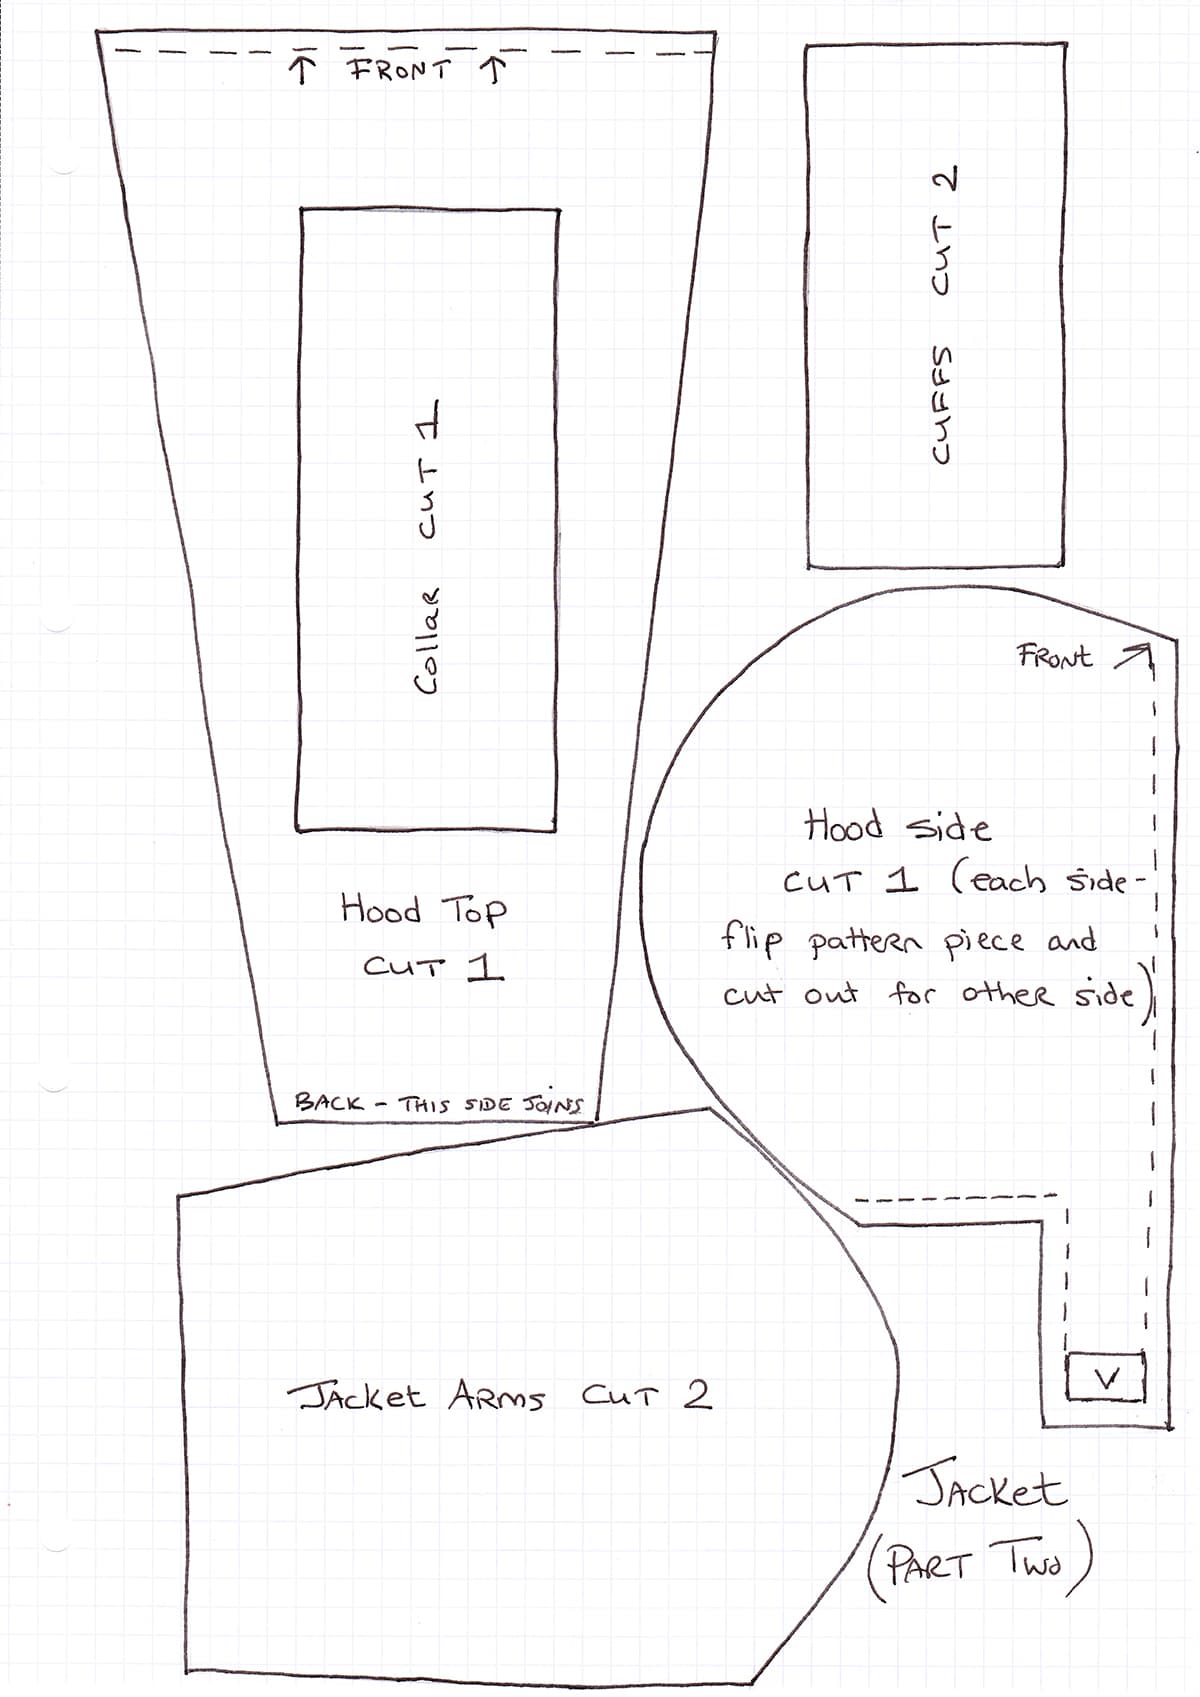
Download the FREE Coraline doll pattern
Click on the preview Coraline doll pattern images below to download and/or print the pdfs. Each sheet is A4 in size and should print off in the correct pattern size.

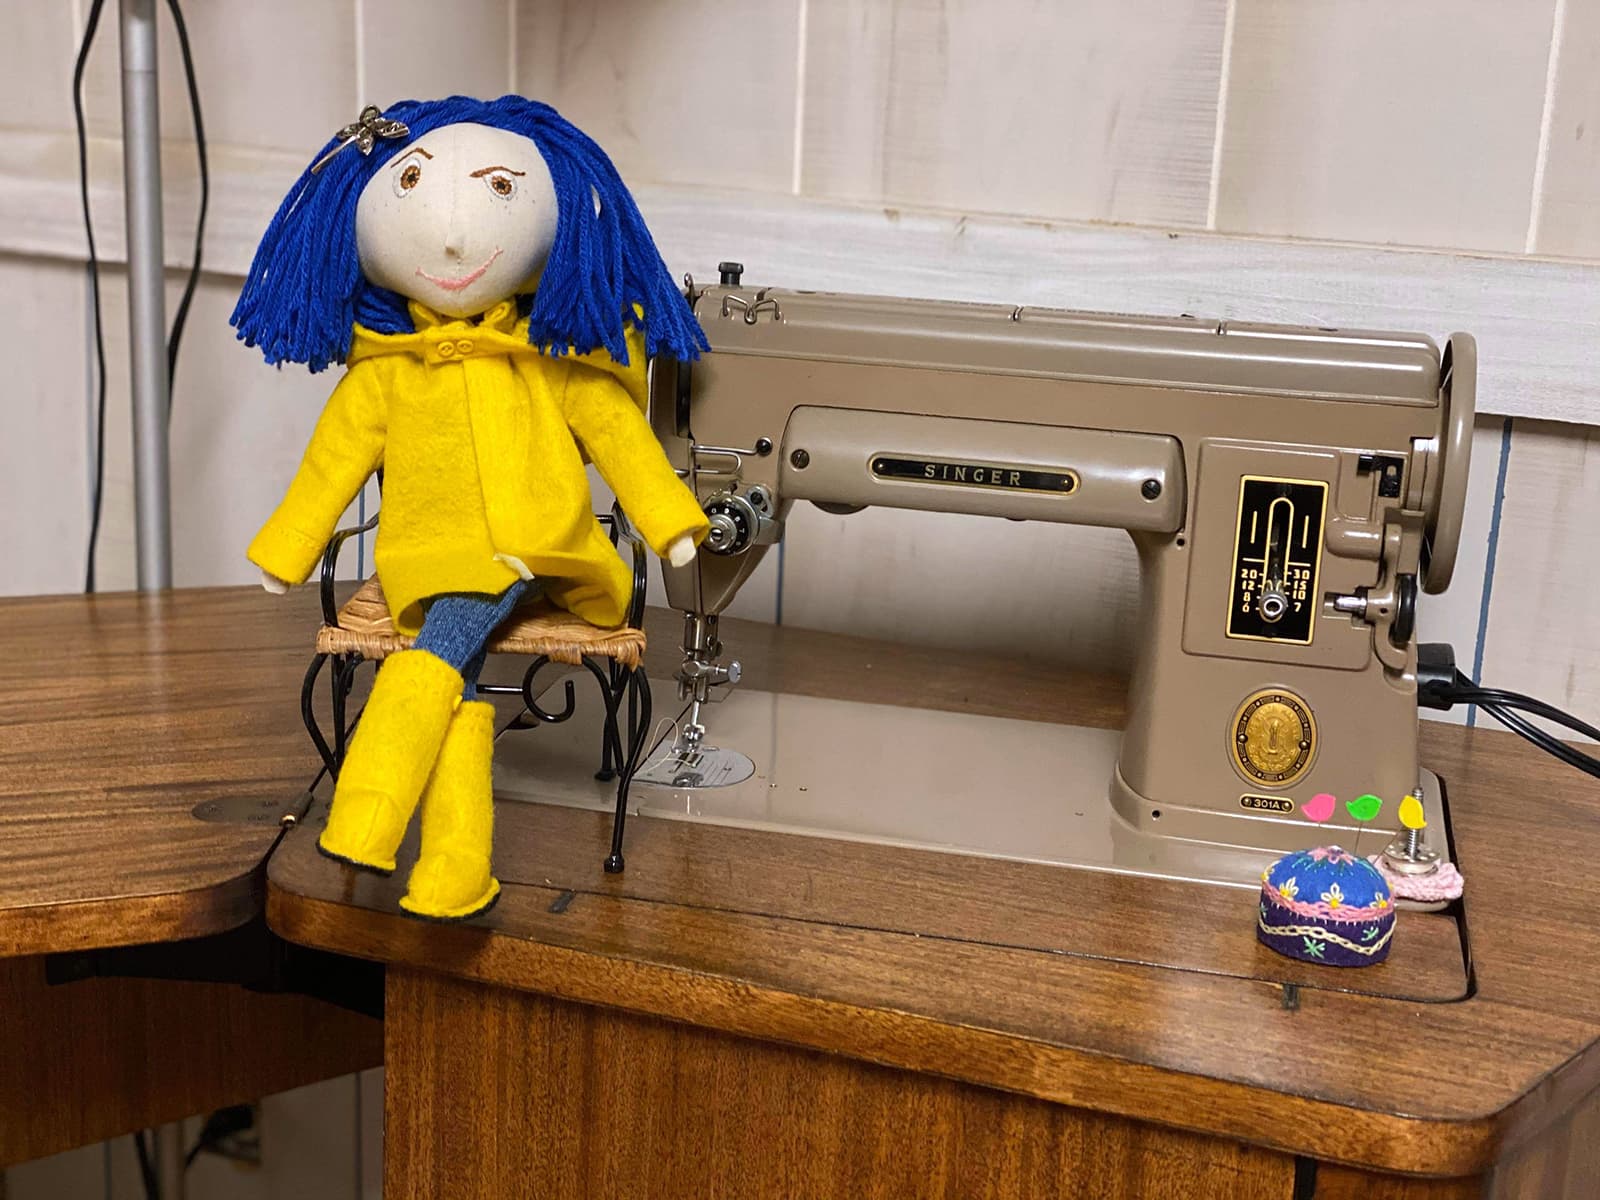
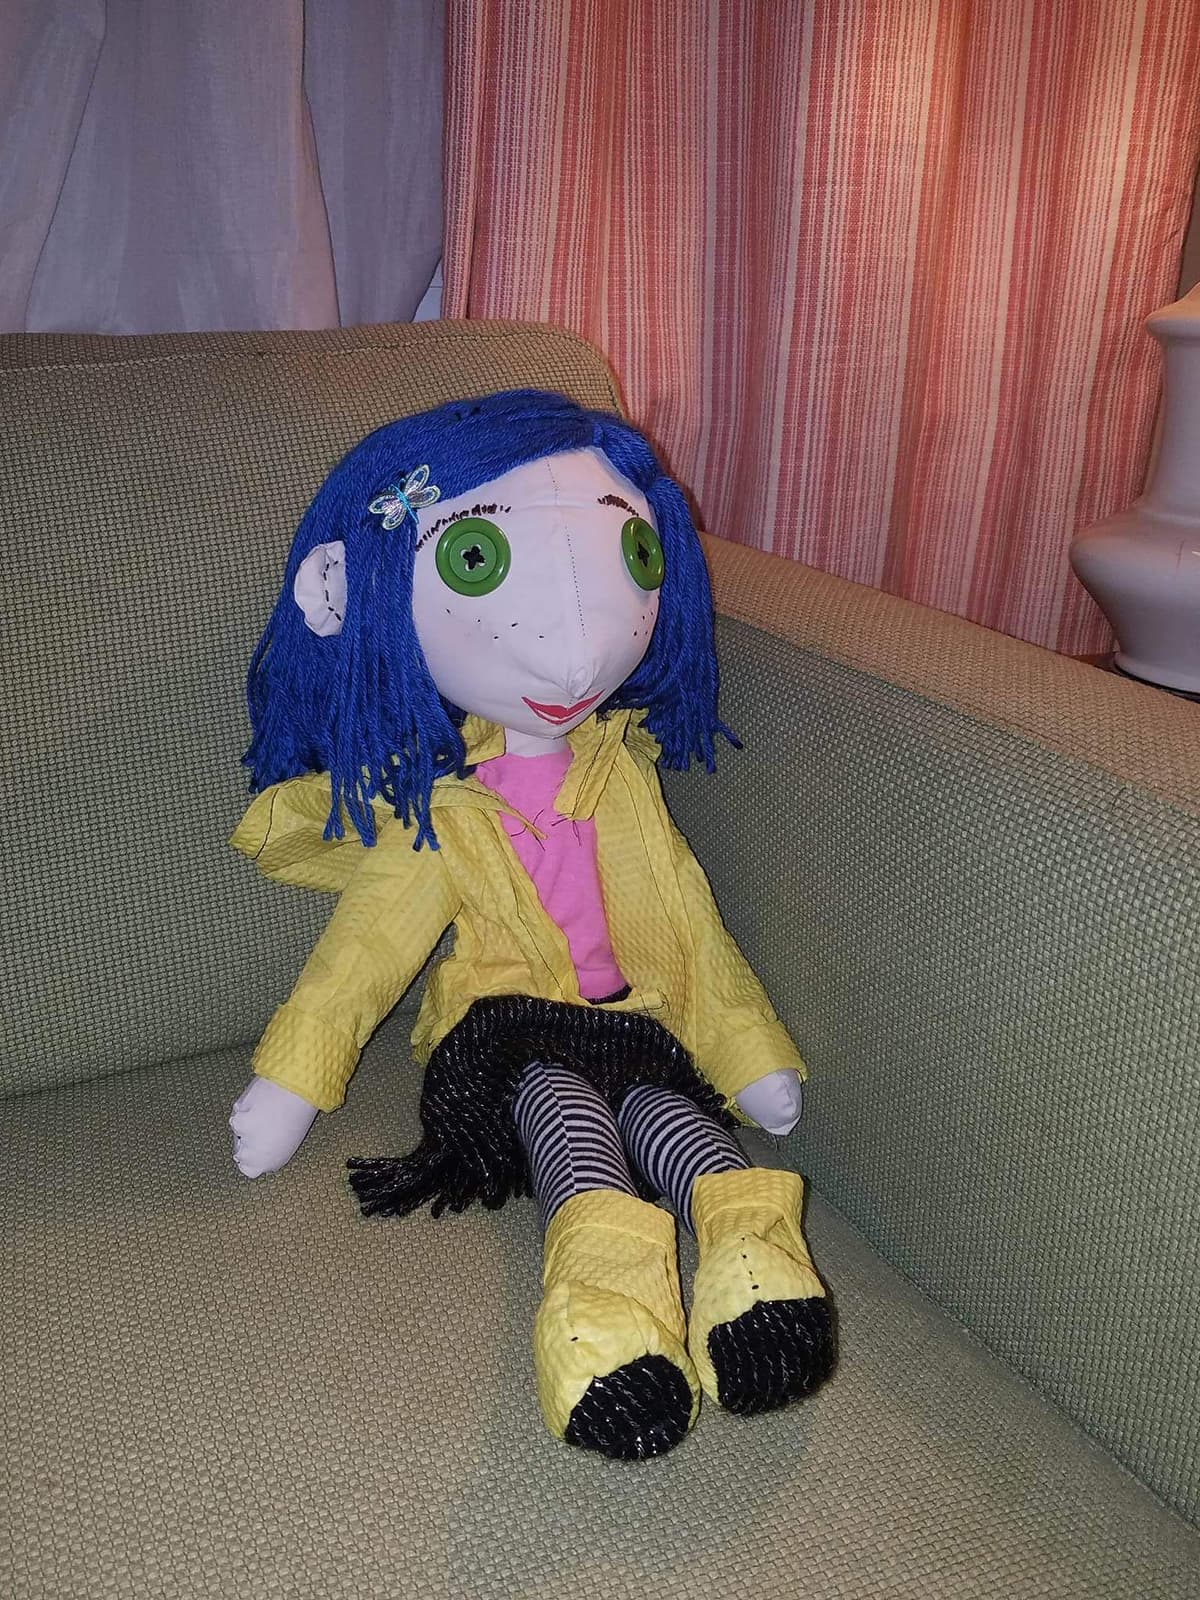
DIY Coraline Dolls made by you!
I hope you enjoy this collection of handmade fabric Coraline dolls! They have been made by readers just like you! If you make a Coraline doll, do send us an image and we’ll add it to the carousel!
Best regards, J. Brown - USA
Tips for making this DIY Coraline Doll – by the sewers who have made it!
- Lining the jacket hood makes all seams enclosed with no turning under of the front edge or hem bottom. Press hood seams open on hood and lining. RST, pin well and stitch all around the 2 layers, pivoting at front tabs to make them square. Leave an opening in top center front of hood. Turn right side out, then close it by topstiching around face area, which also keeps the 2 layers from shifting. Hand or machine sew hood bottom to the neckline, finish tabs as wanted.
- Stuffing that Nose – glue a little cotton in the tip, or I’ve seen some use a little bead or Q-tip point there!
- For those who haven’t turned skinny legs – sew a strong thread tail into the toe seam so it sticks out the top, then pull it Gently to turn RSO. Or use long forceps (you can get them in Walmart fishing departments ! to grab and turn any tube right side out. Have Fun!
- Note for the jacket – you sew the middle hood section AROUND the curved hood pieces, ending up with a straight, even bottom ending in the little front tabs. Sew with pins Vertical to the edges all around. Line the hood with a cute contrast fabric (using same pattenr pieces) and eliminate the separate collar piece. Slip the hood bottom edges in between turned-under coat edges. This makes the tab edges doubled and stronger for a button or Velcro closing.
FREE 14″ Coraline Doll Pattern – step by step instructions
Ingredients
- 0.5 metre flesh-coloured cotton fabric
- embroidery thread dark brown, light brown, orange, yellow, pink, while, grey and flesh coloured
- sewing thread flesh-coloured, pink, yellow, black
- 0.5 metre yellow vinyl-coated fabric
- 0.25 metre denim fabric
- 0.5 metre pink & red striped fabric
- 0.25 metre black felt
- 3 inches thin skirt elastic
- 2 small yellow buttons
- polyester toy stuffing
- 6 inches thin velcro
- 100 grams blue 4-ply yarn
- 1 yellow glass bead
- 60 small pink glass beads
- 7 blue glass beads
- 10 inches fine silver beading wire
- 13 cm wooden dowel rod
Affiliate Links
This recipe card may contain affiliate ingredient and equipment links. As an Amazon Associate I earn from qualifying purchases.
Equipment
Instructions
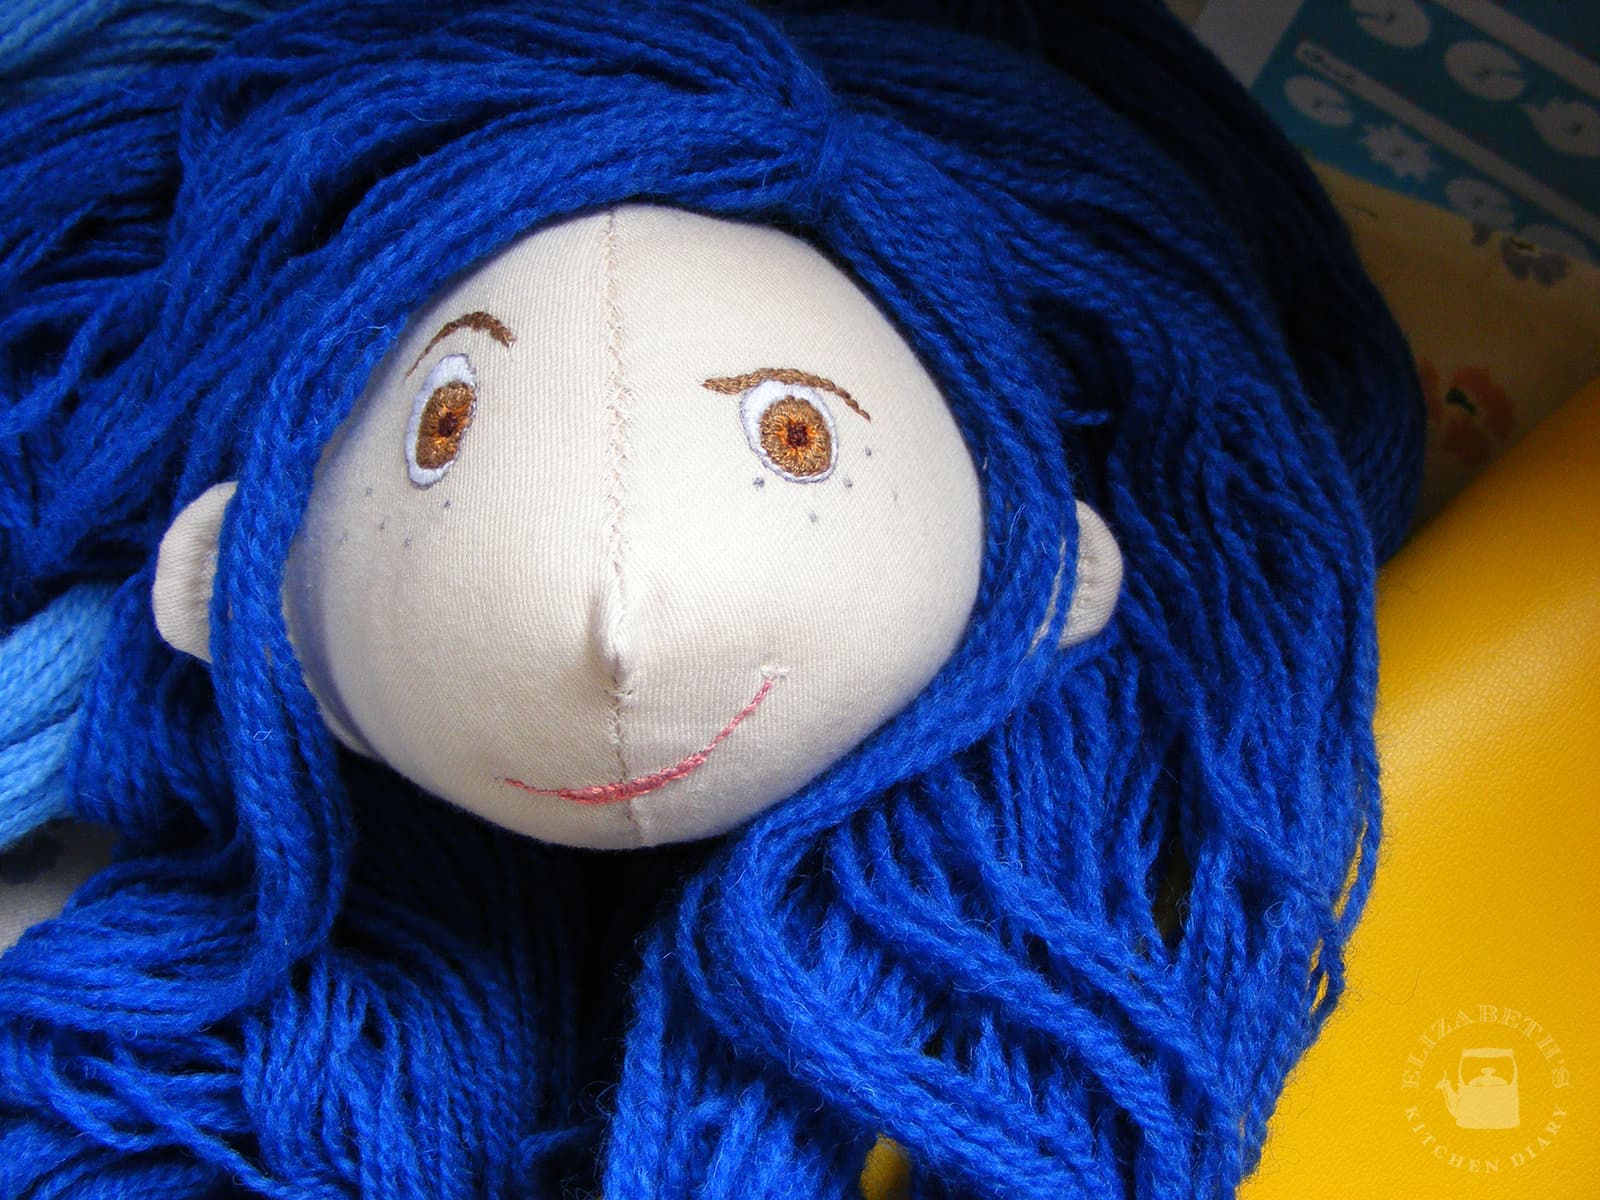
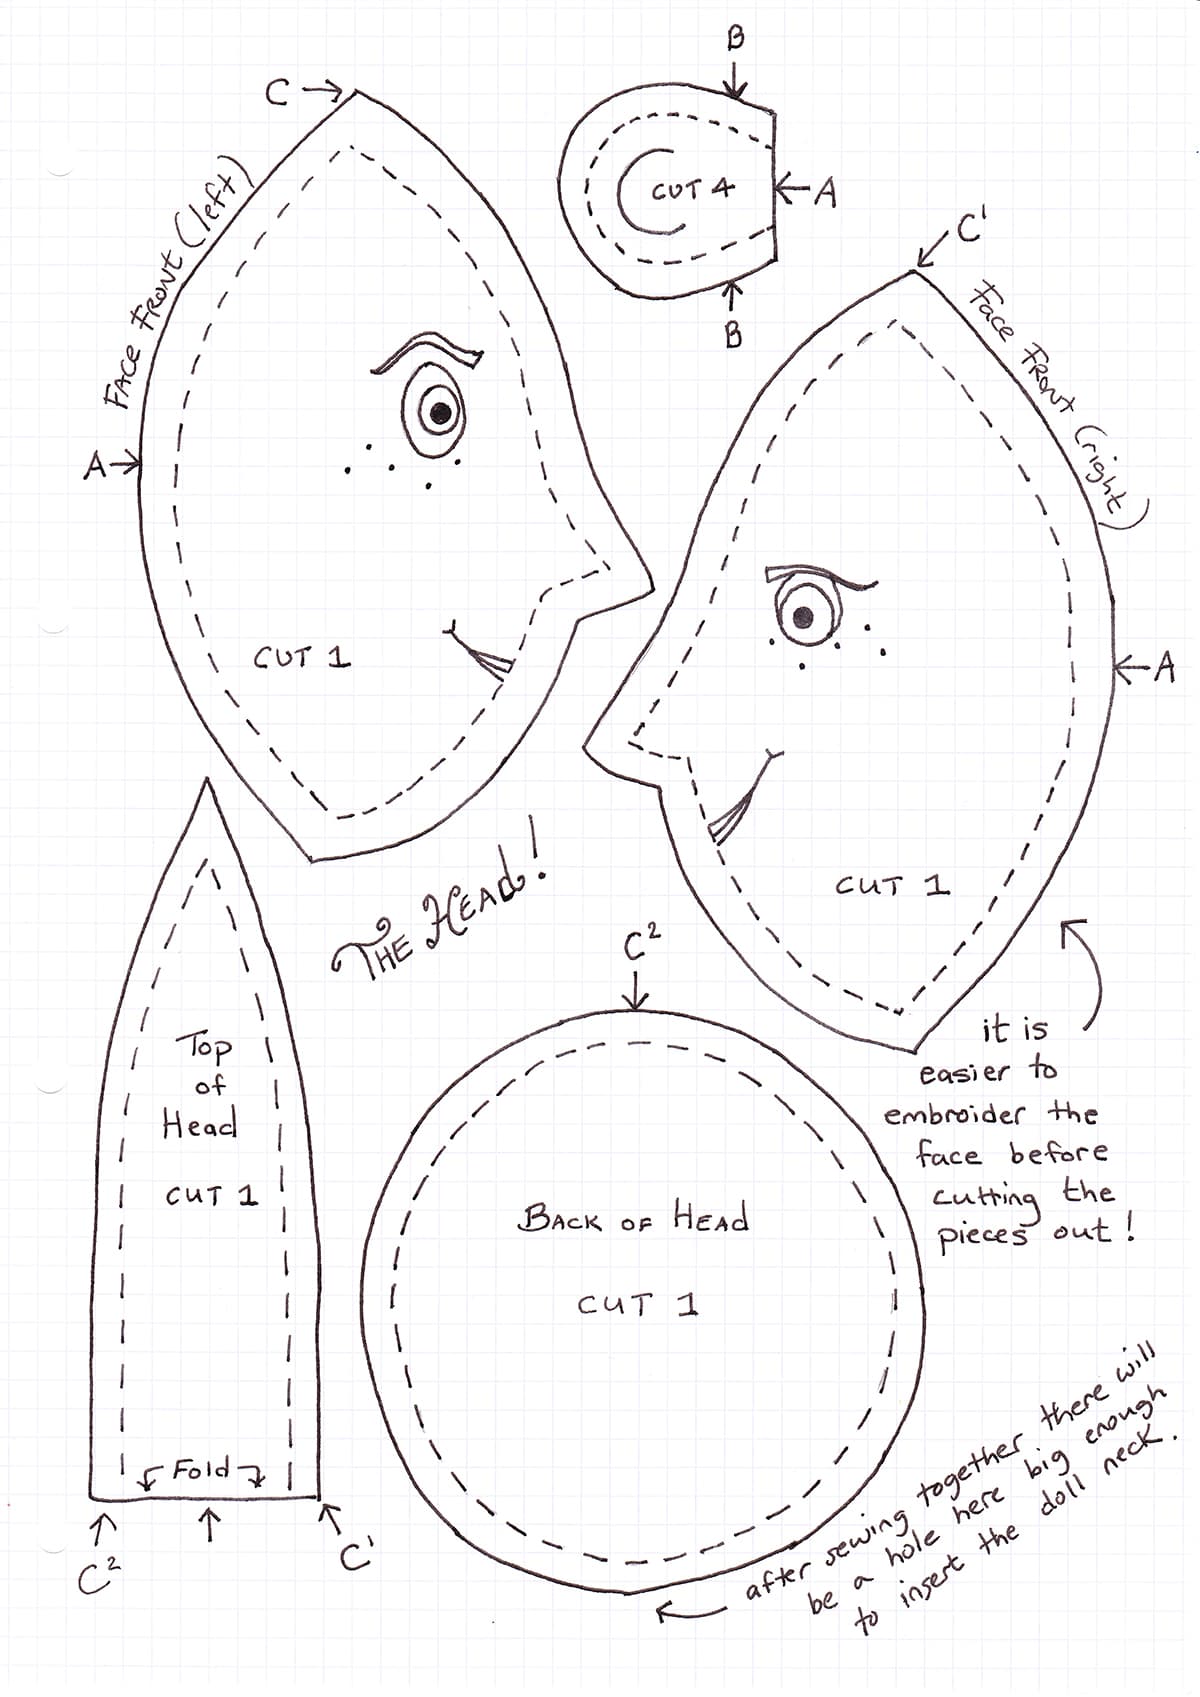
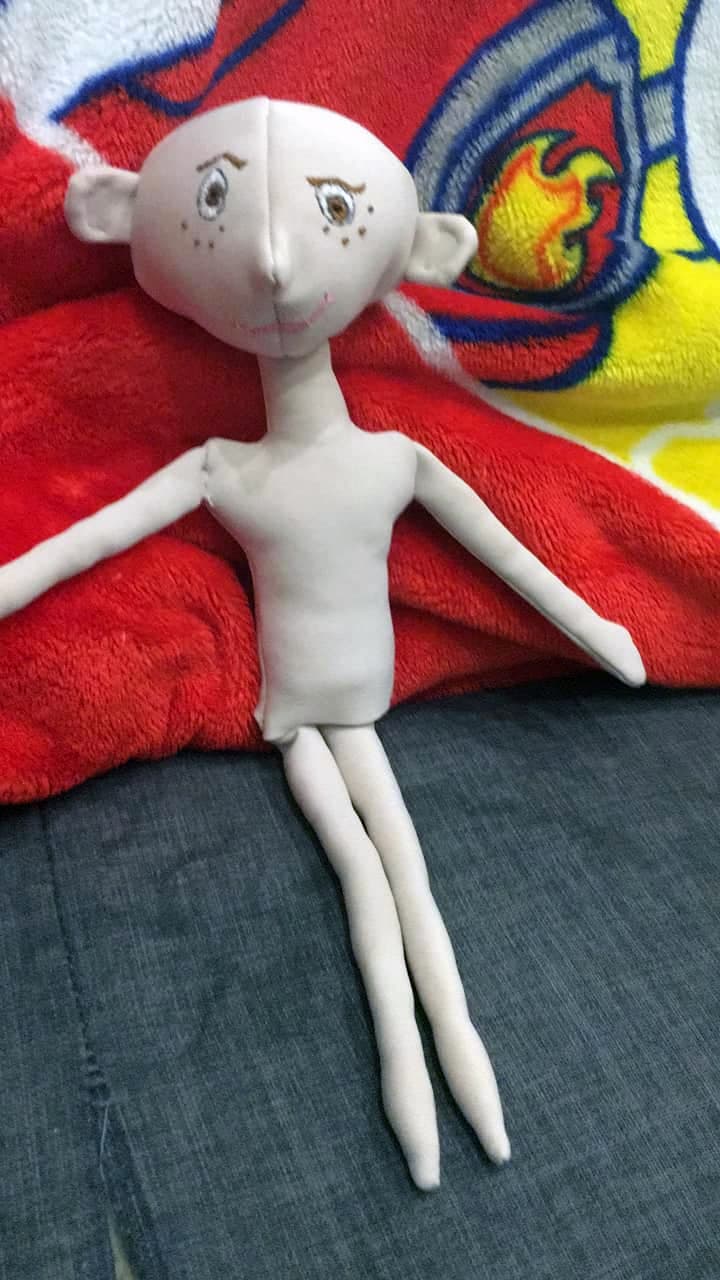
For the Coraline doll head
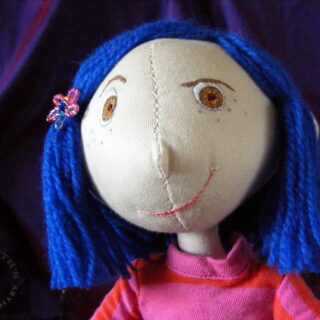
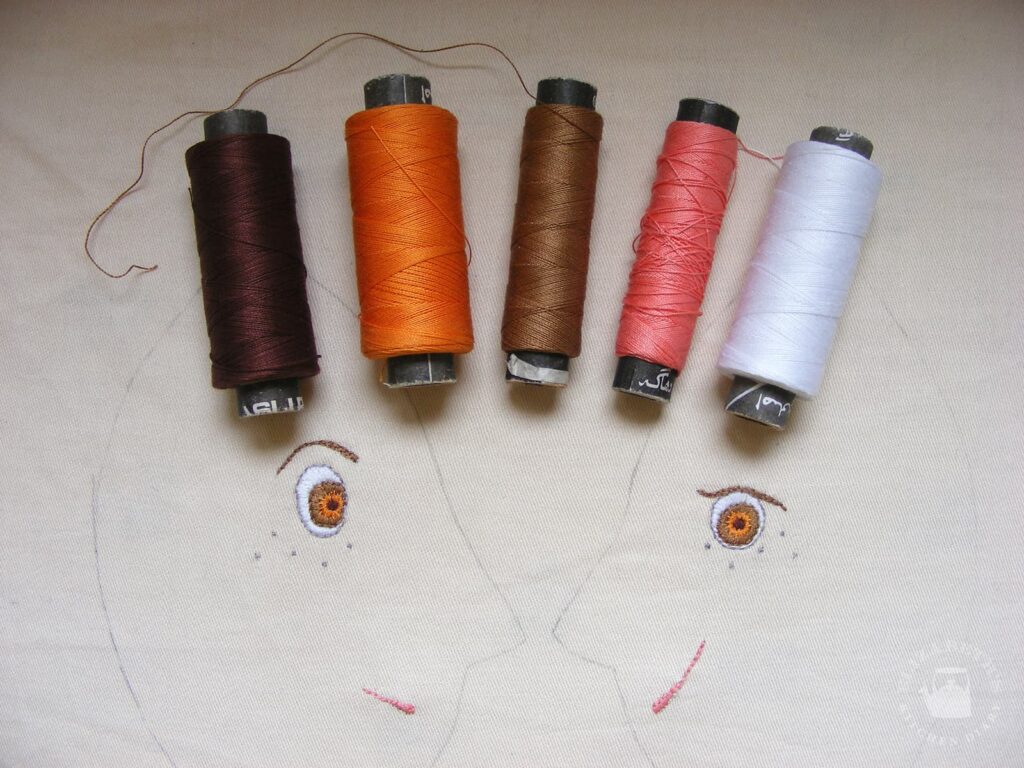
- Trace out the face front pattern pieces (left and right) onto your flesh coloured cotton fabric taking care that the eyes, mouth and freckles are lightly drawn on in pencil.0.5 metre flesh-coloured cotton fabric
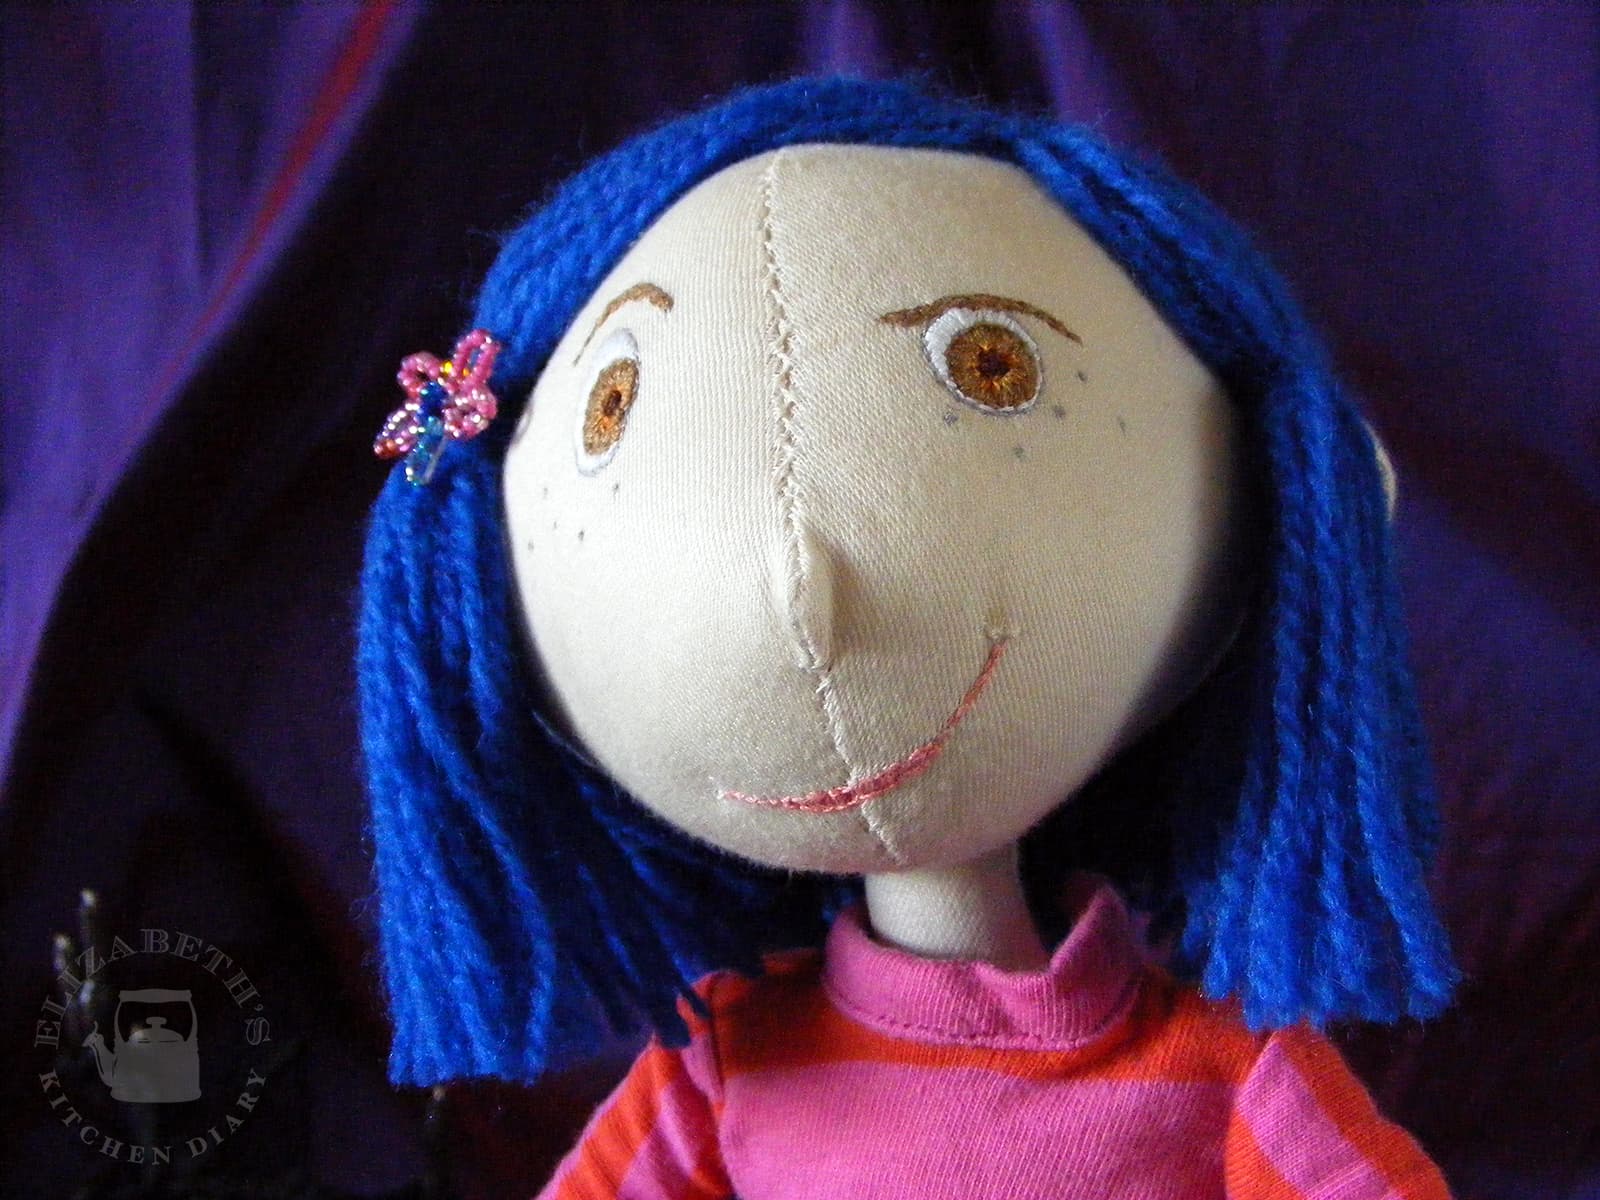
- Embroider the eyes, freckles and lips using the embroidery thread. The eyes and eyebrows are the same colour light brown and the pupil of the eye is dark brown. Using a single orange thread accent the eye near the pupil. Embroider light grey freckles and light pink lips. Embroider a light grey line with a single thread around the outside of the eye and a light brown line around the iris.embroidery thread
- Cut out all the face pattern pieces.
- With right sides together pin the two front face halves together matching up nose and lips and sew down the front (nose side) with a 1/4 inch seam. Zig-zag edge with the smallest setting on your machine, if you wish. You may need to embroider a little bit more to make the lips join across the seam.sewing thread
- With right sides together, pin centre of Top of Head piece (marked as C1) to the seam join at the top of the face front pieces. Sew with 1/4 inch seam. Zig-zag edge.
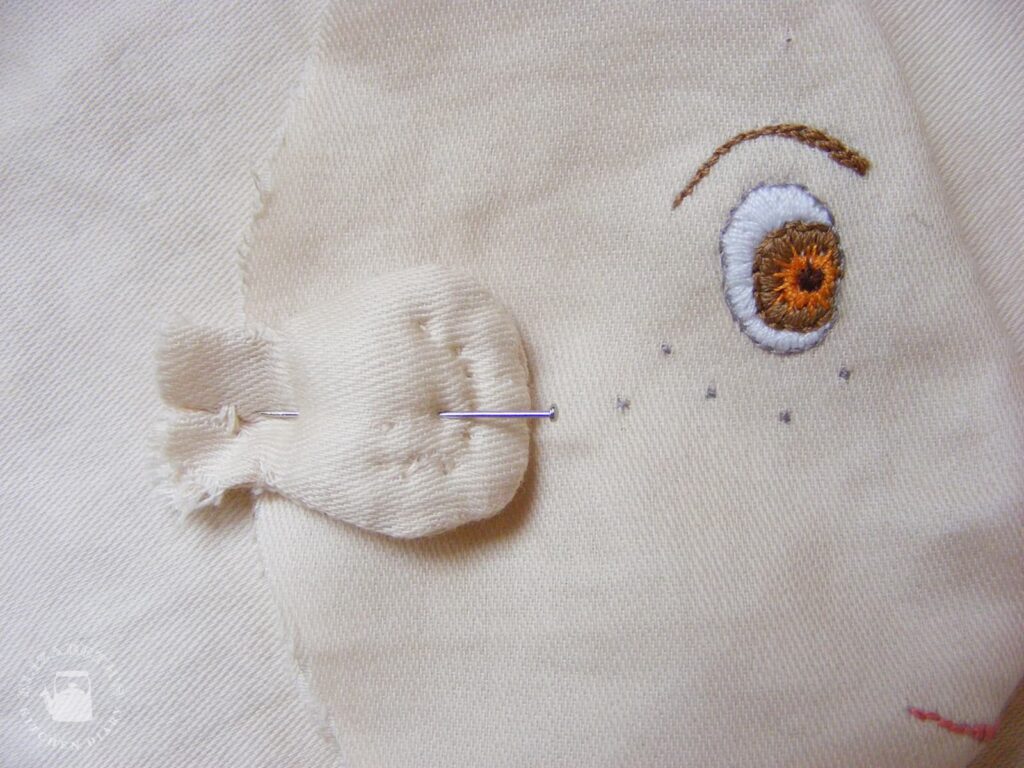
- Sew ear halves together leaving the end (marked A) open. Turn right side out, lightly stuff, and embroider an accent C shape in flesh coloured thread where marked on the pattern.sewing thread
- With right sides together pin ear pieces facing inwards so that they are level with the bottom of the eyes (marked A on the pattern, the seam for ear positioning is marked B.) and pin the Back of Head to Top of Head (match up points marked C2) and continue pinning along the face front edge. There will be a 1cm gap where the neck will be inserted. Sew, leaving this gap open, with a 1/4 inch seam. Zig-zag edge.
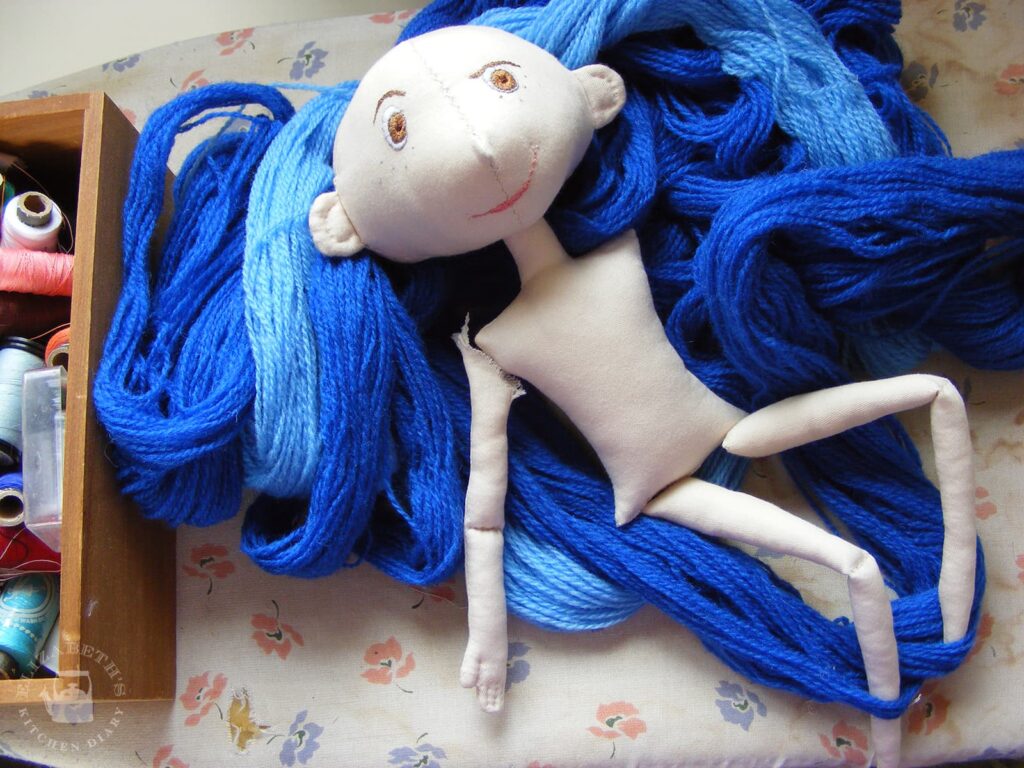
- Turn right side out and stuff lightly (more stuffing will be added later).
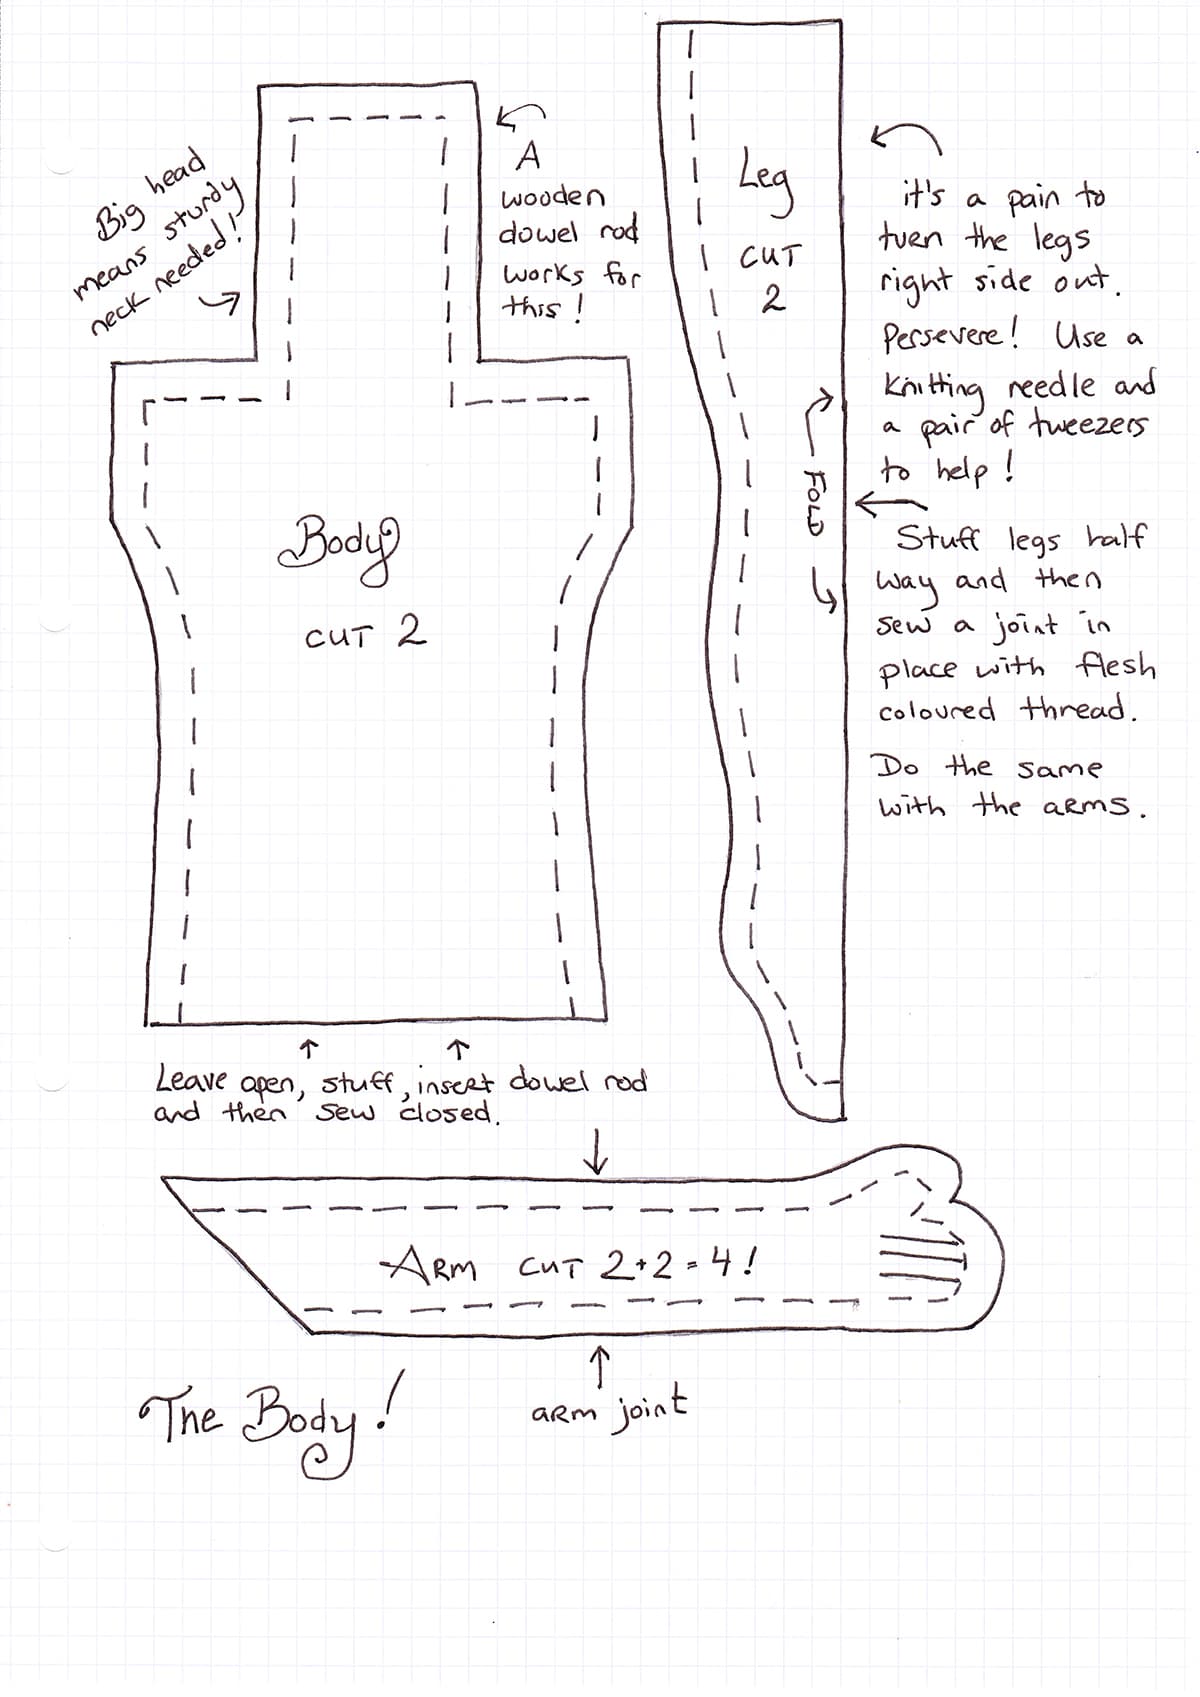
For the Coraline doll body
- Cut out Body parts with flesh coloured fabric. Sew together with a 1/4 inch seam leaving the bottom open. Turn right side out.0.5 metre flesh-coloured cotton fabric
- Sew arm parts together leaving shoulder gap open. Turn right side out. Lightly stuff fingers and embroider the fingers with flesh coloured thread as marked on pattern. Stuff until arms are firm until you reach the elbow. Hand sew across the elbow joint with flesh coloured thread if you want the elbow to bend. Turn open ends inward and hand sew edge shut using flesh coloured thread.sewing thread
- Sew leg seam and turn right side out. This is a right pain to do but persevere. Use a knitting needle and a pair of tweezers to help you, just make sure you're gentle with the pointy end of the knitting needle and don't stick it through the fabric! Stuff until firm until you reach the knee. Sew a knee joint if you want the knee bendable and then continue to stuff until firm. Turn open ends inward and hand sew edge shut using flesh coloured thread.polyester toy stuffing
- Put a little stuffing into the top of the neck and insert dowel rod. Using a pair of tweezers add more stuffing around the wooden rod in the neck until firm. Stuff body until firm, taking care to keep the dowel rod in the centre surrounded in stuffing.13 cm wooden dowel rod
- Turn open edges at the bottom of the doll body inward and hand sew shut using flesh coloured thread.sewing thread
- Stuff the head until firm leaving a space for the neck to be inserted (stick your finger in and wiggle it around so there's a gap). Turn open edges on neck opening inward and hand sew the head in place using flesh coloured thread. The neck will go quite far inside the doll's head. This is to keep the head from flopping over!sewing thread
- Hand sew arms and legs onto the doll using flesh coloured thread.sewing thread
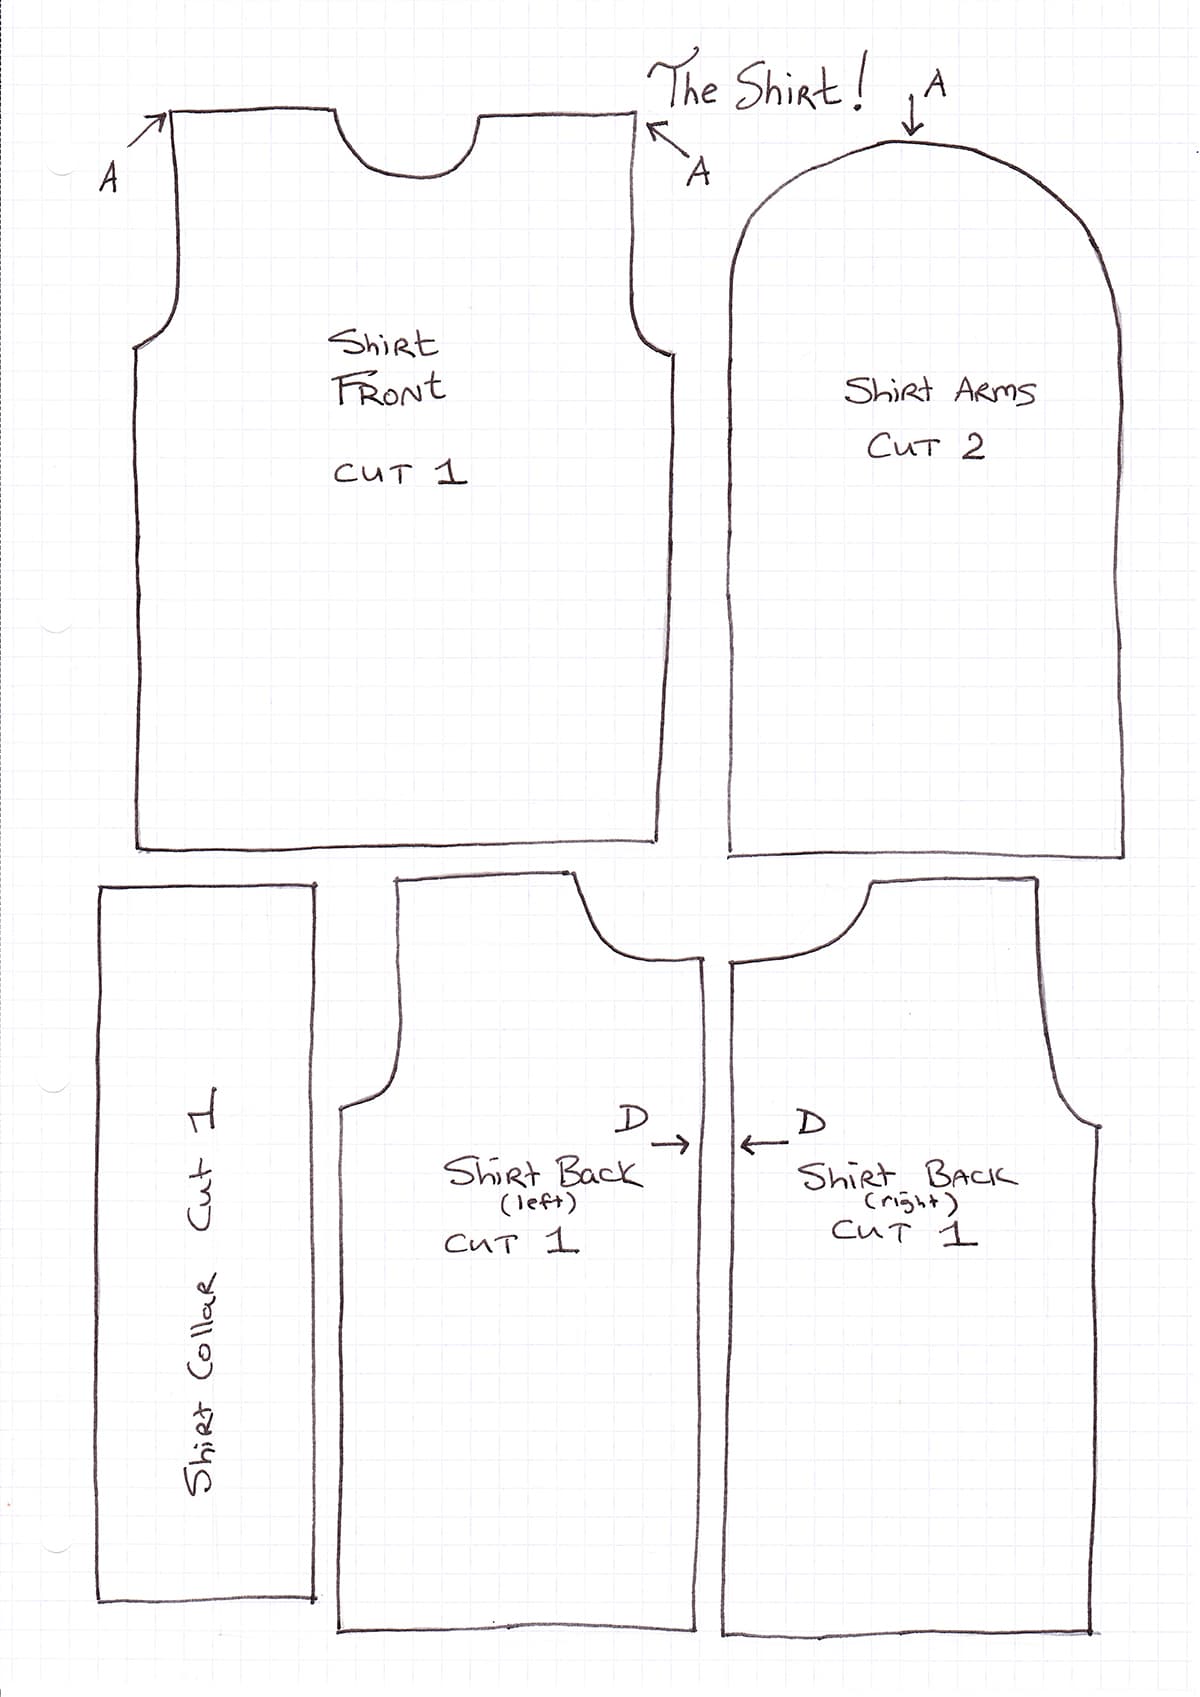
To make the shirt
- Cut pieces out of pink/red striped t-shirt fabric. With right rides together, pin shoulders of shirt back (left and right) to the shirt front. Sew with a 1/4 inch seam using pink thread. Zig-zag edges.0.5 metre pink & red striped fabric, sewing thread
- Sew cuffs and shirt bottom over with 1/4 inch edge.
- Match shirt arms (marked A) with centre seam on shoulders (right side together) and sew with 1/4 inch seam. Zig-zag edges.
- Pin arm and shirt sides together and sew. Zig-zag edges.
- To make collar, pin the collar onto the neck area lengthwise, right sides together, and sew with a 1/4 inch seam. Fold over remaining collar, twice, so that you are now working on the inside of the shirt. Sew along the edge to fix the collar in place. Try to keep the seam in the same place as the seam on the outer collar edge.
- Pin the shirt back pieces together and sew from the bottom up, stopping at the spot marked D on the pattern.
- Fold the remaining edge on the shirt back and collar inwards and sew into place.
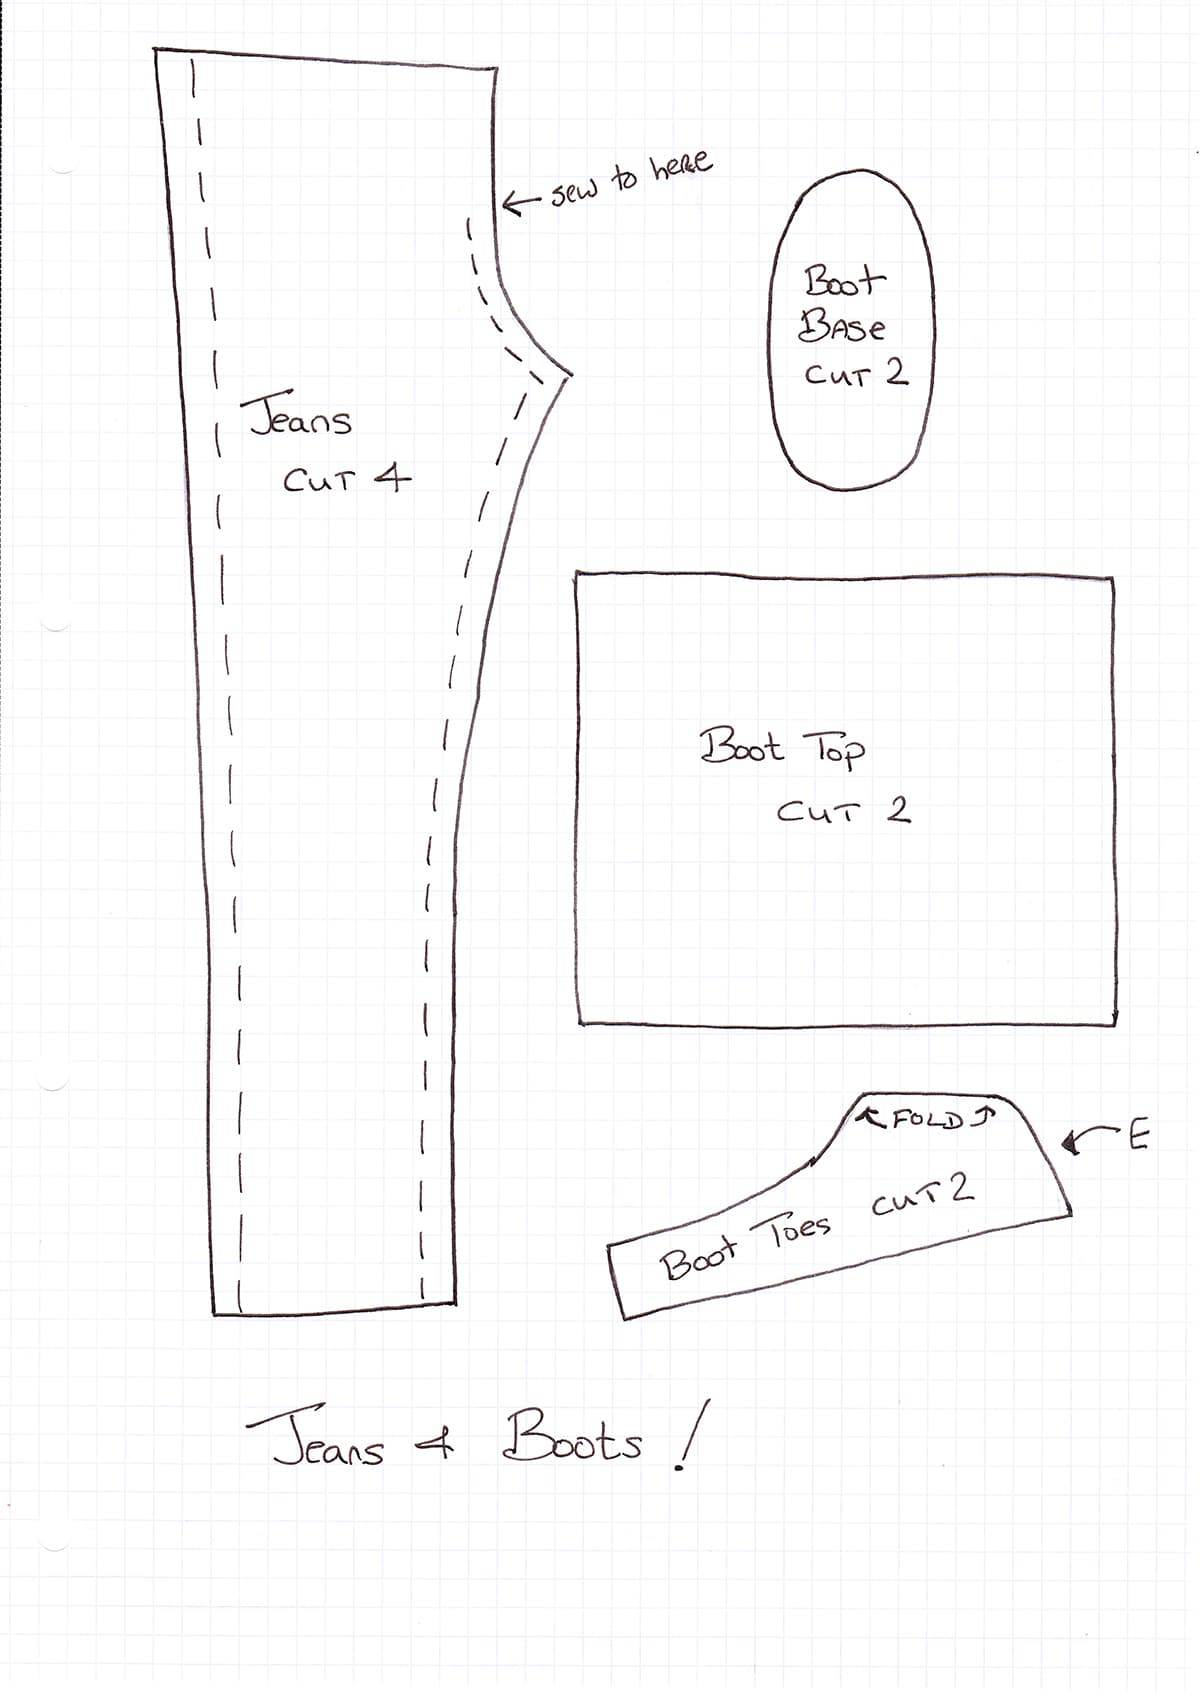
To make the jeans
- Cut out denim pieces and hem the bottom and top edges with a 1/4 inch seam.0.25 metre denim fabric
- With right sides together, sew outer and inner leg seams, leaving the crotch area for now.sewing thread
- Turn one leg right side out and insert into the other leg so that the right sides are facing together. Pin and sew crotch area together leaving a 1 inch gap at the top (marked on pattern).
- Turn jeans right side out.
- Fold over remaining edges of back of trousers and hem. Sew skirt elastic around the top. Affix a 1/2 inch piece of velcro to either side so that the jeans will stay shut.3 inches thin skirt elastic, 6 inches thin velcro
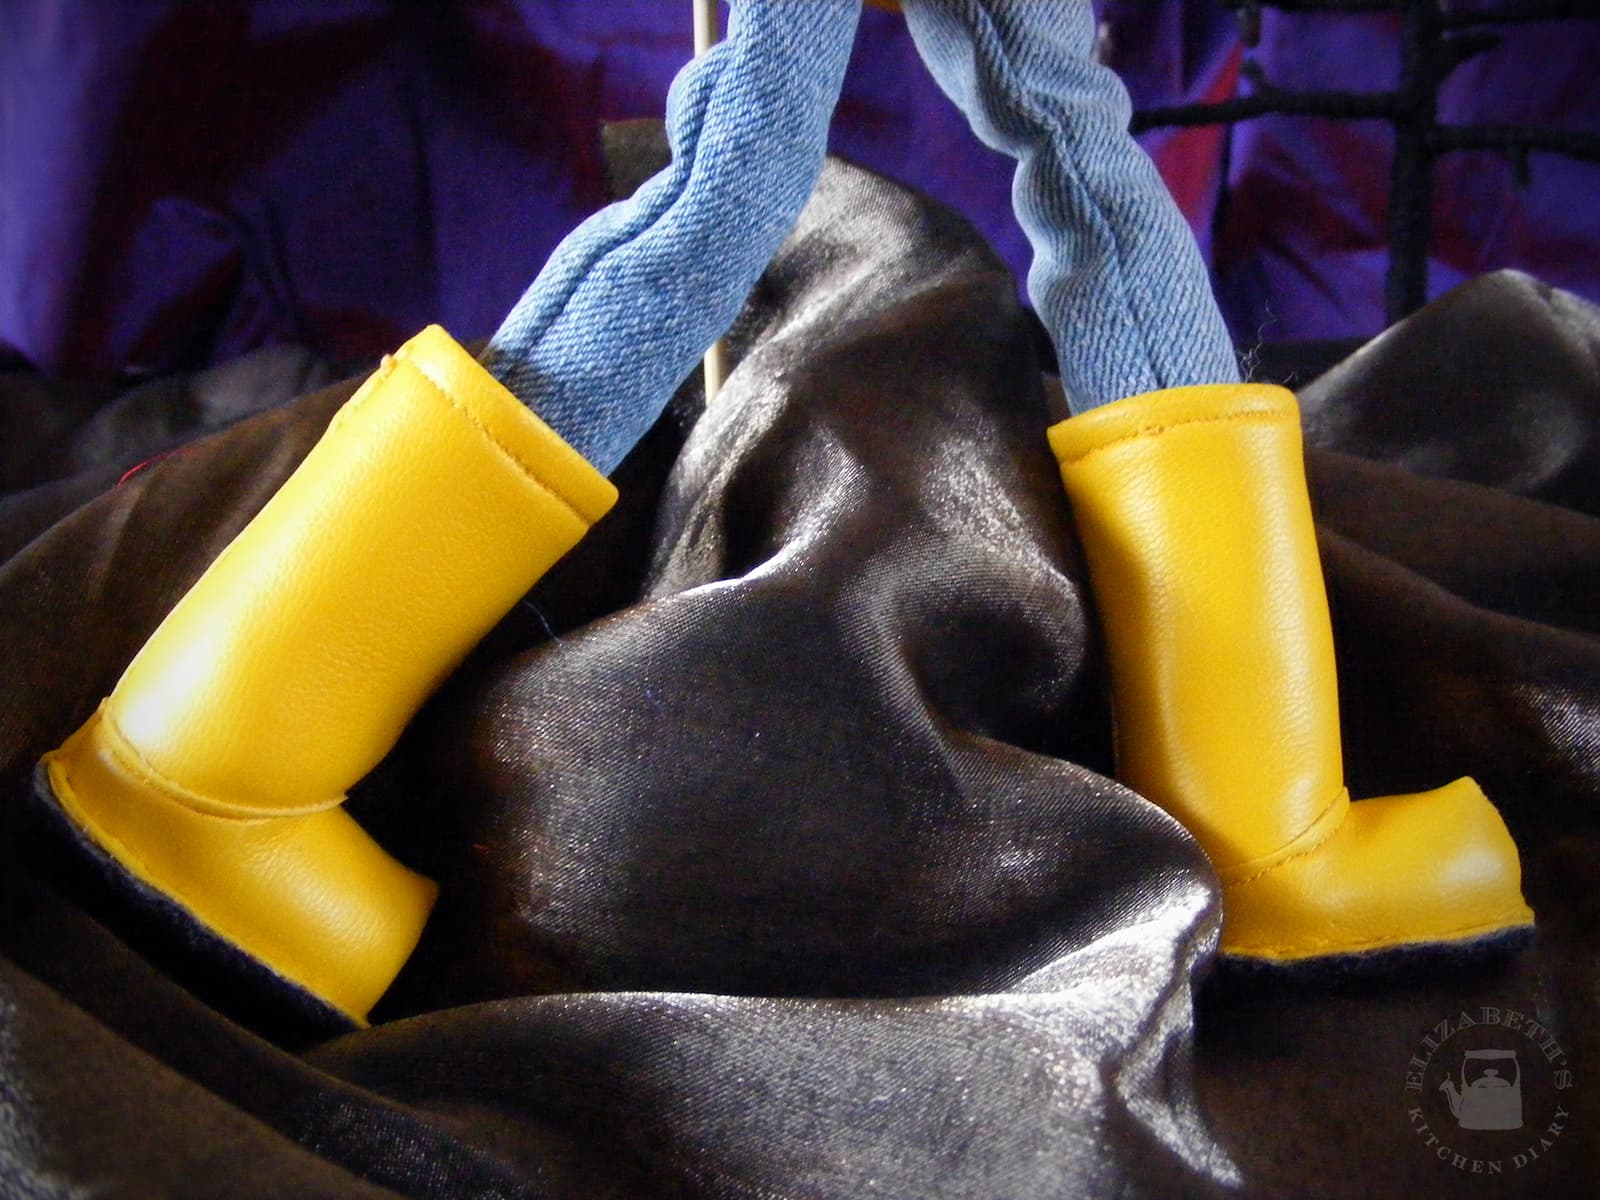
To make the boots
- Cut Boot pieces out of yellow vinyl-type fabric.0.5 metre yellow vinyl-coated fabric
- Sew front toe down the front (marked E) with a 1/4 inch seam.
- Open up boot toes and lay flat over the top of the Boot Top. Pin in place keeping the bottom edges of the boot flat. Sew as close as possible to the edge over the top of the boot.
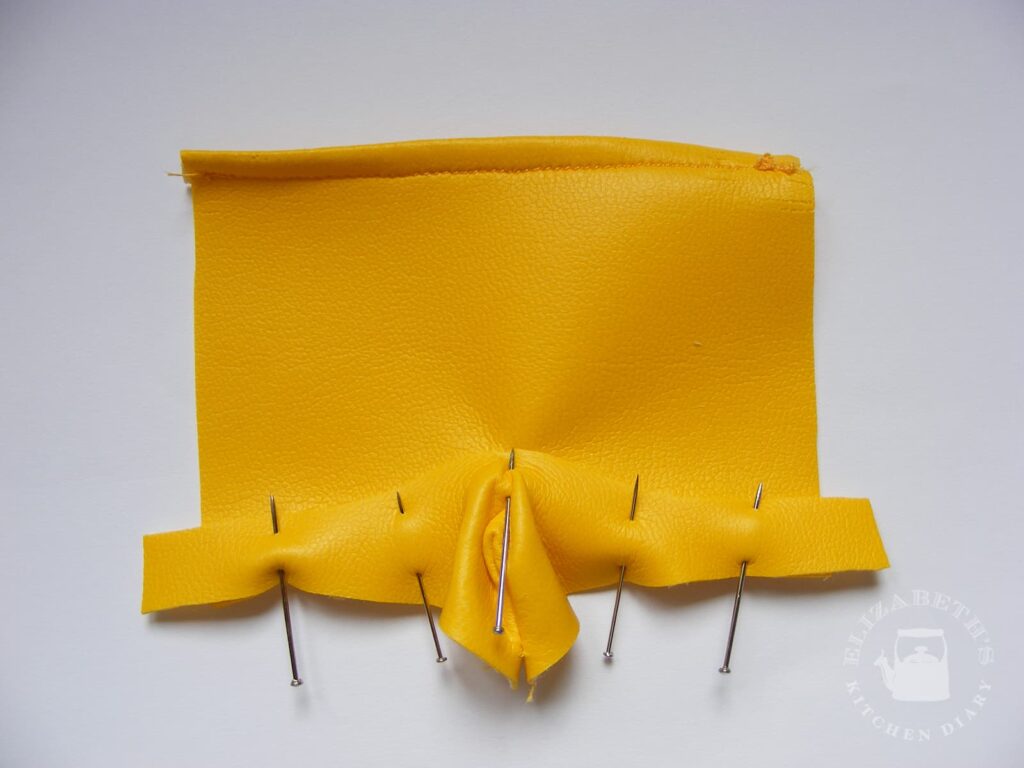
- Turn right sides together and sew up the back of the boot. Turn right side out.
- Cut Boot Base out of thick black felt.0.25 metre black felt
- Hand sew the bottom edge of the boot to the boot base the way Doc Martens are stitched together. Stuff toes with polyester filling. You may need additional stuffing in the boot to keep them on the doll.polyester toy stuffing
For the raincoat
- Cut all pieces out of yellow vinyl fabric.0.5 metre yellow vinyl-coated fabric
- With right sides together pin shoulders and sew with a 1/4 inch seam using yellow thread.sewing thread
- Pin arms to shoulder edges, matching centre of arm with centre shoulder seam.
- Pin cuff to arm edge and sew with a 1/4 inch seam. Fold over to the back of the arm and sew cuff in place, keeping stitching in the same place as on the front so no seam shows.
- Sew arms and raincoat sides with a 1/4 inch seam.
- Pin Hood Top to Hood Sides with the front edges together (make sure the wide section of the hood top is in the front!). Sew with a 1/4 inch seam. I found it easier to do this by folding the side edges of the Hood Top flat and pinning into place.
- Fold over edges marked with a dotted line and sew into place.
- With right sides together pin Hood Top to bottom edge (the thinner side) to the back of the raincoat collar area. Sew into place. Zig-zag to reinforce.
- Affix collar the same way you did the cuffs above, folding the front edges in before sewing into place.
- Hem raincoat bottom edge over.
- Sew a small piece of velcro on the front neck piece (marked V) and hand sew two small yellow buttons on the outside edge.6 inches thin velcro, 2 small yellow buttons
- Hand sew velcro along the inside of the front of the raincoat so it will stay closed.6 inches thin velcro
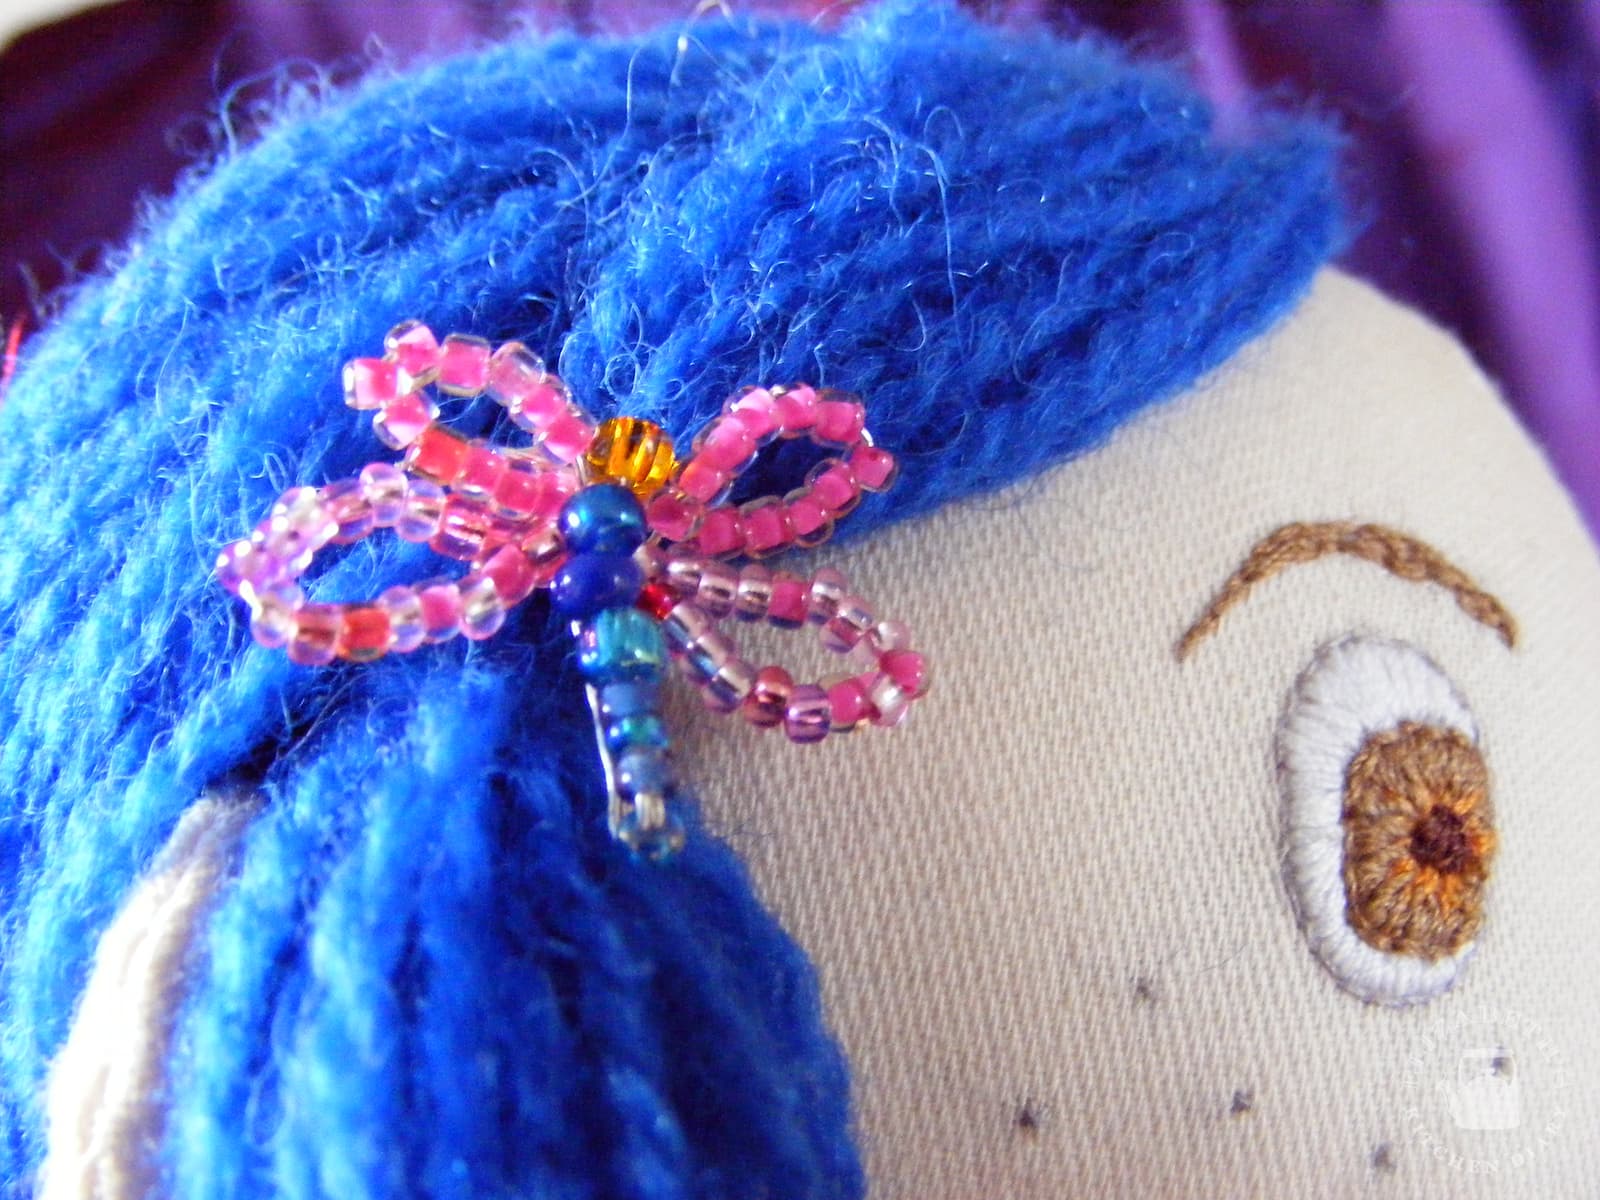
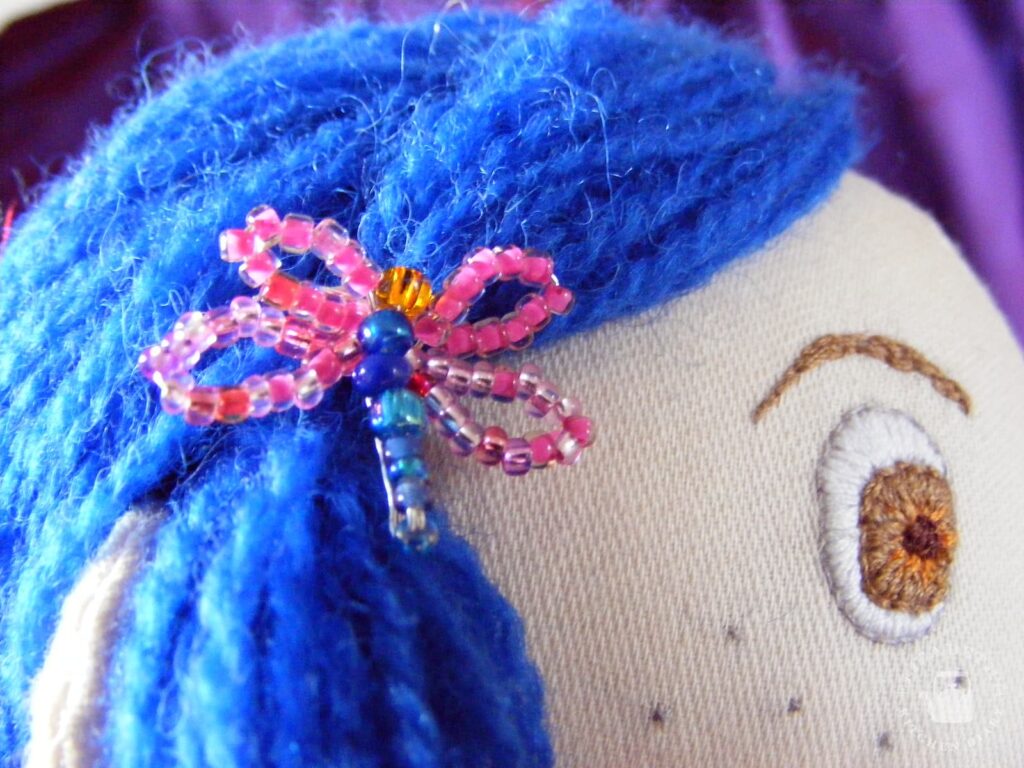
For the dragonfly clip
- Thread the yellow bead onto the centre of the beading wire and fix into place by twisting the wire.10 inches fine silver beading wire, 1 yellow glass bead
- Make four wings using the pink beads, two on each side, fixing each wing into place by twisting the wire.60 small pink glass beads
- Make the body of the dragonfly by threading the blue beads onto one wire. Turn the wire back up to the centre and join with the other wire.7 blue glass beads
- Sew onto the head once the hair is in place.
For the hair
- Cut blue yarn into 9 inch lengths.100 grams blue 4-ply yarn
- Using a curved tapestry needle thread each piece of wool through the scalp leaving a 1/4 inch gap on either side. Tie wool together gently (as to not break it!) and continue.

- Sew hair onto the scalp in rows. This is time consuming but the closer you can get the rows to each other the fewer gaps of scalp will show. I fixed the hair into place using additional pieces of wool sewn into the scalp so that it doesn't flap all over the place. Using very sharp scissors cut the hair so that it is shoulder length. Start longer and cut shorter if need be as you don't want to do this all over again if you cut it too short!
Notes
Pin this DIY Coraline Doll Pattern for later
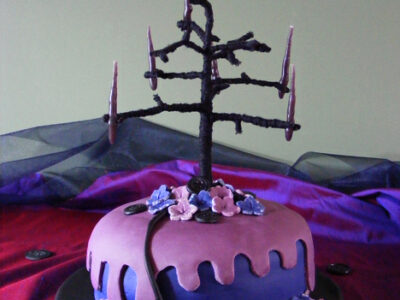
 Coraline Birthday Cake
Resuming other hints from Sept, 2020–
Lining the jacket hood will mean all seams are enclosed, and no turning under of front edge or hem bottom. Press hood seams open on hood and lining. RST, pin well and stitch all around the 2 layers, pivoting at front tabs to make them square. Leave an opening in top center front of hood. Turn right side out, then close it by topstiching around face area, which also keeps the 2 layers from shifting. Hand or machine sew hood bottom to the neckline, finish tabs as wanted.
Stuffing that Nose can be helped formed by gluing a little cotton in the tip, or I’ve seen some use a little bead or Q-tip point there!
For those who haven’t turned skinny legs, sew a strong thread tail into the toe seam so it sticks out the top, then pull it Gently to turn RSO. Or use long forceps (you can get them in Walmart fishing departments ! to grab and turn any tube right side out. Have Fun!
Coraline is still popular, she pops up on Pinterest everywhere!
Note for the jacket: you sew the middle hood section AROUND the curved hood pieces, ending up with a straight, even bottom ending in the little front tabs. Sew with pins Vertical to the edges all around. Line the hood with a cute contrast fabric (using same pattenr pieces) and eliminate the separate collar piece. Slip the hood bottom edges in between turned-under coat edges, the tab edges will be doubled /stronger for a button or Velcro closing.
Hi there
Im having difficulty with the head. Mainly how to sew the top of the head section together with face and back. Find it hard to follow the instructions for that part
Thanks
Frances
thank you
I wish I could leave a picture, but thanks so much for this pattern. I made the doll for my 4yr old granddaughter and she loves it. Coraline turned out really cute.
Thanks so much for sharing! My daughter asked me to make a Coraline doll for her for Christmas, and I was just going to freestyle it, but this will make it SO much easier (especially the head, I was struggling with how I was going to do that).
This is such an adorable pattern, I can’t wait for her to go to sleep tonight so I can get started 🙂
Thank you so much for this pattern!
I was told by my art teacher to make a coraline doll as I had been looking at them, but with my own design. As in the film the doll is of coraline, I decided to make a mini me. I spend ages looking for a good pattern on the internet and when I found this I was so relieved!
The pattern is amazing (but I got confused at some stages – how to do the hair and sewing it all together – because I couldn’t understand the instructions).
I changed it to have blonde hair and edited the outfit to one in the likeness of my school uniform (adding button eyes too, and a creepy sewn on smile).
This is a great pattern so thanks!!!
Hi I have made the doll, jeans, shirt and skirt for Coraline, but I am having difficultly following the instructions of the rain coat. Would you be able to enrich my life and provide a more detail description, PLEASE. Eg which pieces of the hood are sewn to which part of hood panel. which bits are hemmed and how to attach to jacket and collar. I am feeling quite lost on this part.
hoping you can help
thank you
Marcia
My sincerest apologies – it was my first (and only!) doll pattern so I guess I wasn’t as clear as I should have been. There are three parts to the hood – the top centre piece and the two sides which fasten in the front with a bit of velcro. The only part that is hemmed is the hood front once the three parts are sewn together (they’re marked with a dashed line on the pattern), and the back of the centre hood piece is the bit that is affixed to the jacket in the back before you put the collar on. The collar is added afterwards like the cuffs of the shirt. I’d love to see a photo once you’ve finished! 🙂 my email is elizabeth (at) elizabethskitchendiary.co.uk 🙂 Happy sewing!
HI Elizabeth
I find myself at the request of my 5 year old granddaughter wanting Nana to make her a Coraline doll for her upcoming birthday. I am able to Get the face part ony of the pattern and was wondering how I’d obtain all the pieces to complete the doll. much appreciated. Thank you
Hi Pamela, oh how wonderful! I hope you managed to download all the pattern pieces? Use the arrows to scroll left and right through the various pattern pieces.
Hi,
You are a very generous person! My granddaughter wants a Coraline doll, and I am shopping for the bits today so I will have plenty of time to complete it before Christmas.
I’ll send a picture when I’m done.
All the best,
Jackie
How cute is this pattern! I am bookmarking this for later!
thank you so much for the awesome pattern. i run programs for adults with disabilities and had someone ask to make a Coraline doll. Your pattern saved me so much time! Thank you!!
Oooh! I do something similar.
Elizabeth, Thank you so much for sharing your talent. Seriously, and easy to understand.
I really appreciate it.
Im having a go at this
My girl loves coraline n i was trying to get the doll but its priced at silly highs over £100
Thank u so much for this guide
I’d love to see a photo when you’ve finished! Good luck with the sewing and if there are any instructions needing to be clearer, just let me know! It was my first doll pattern. 🙂
Still not conplete as waiting on vinyl yellow fabric as that was the one thing i didnt have mite add more hair hence not cut it yet
But as a person who last sewed over 20 yrs ago and that too basic stuff thats saying ur intructions were great to follow
The only thing i had a problem on was the top of head part for the life of mw cudnt figure it out still its worked without it
http://tinypic.com/r/2w20cvo/8
Lol and i made 2 threw myself into the deep end
My stitching can be debated lol but hope my lil girl and neice will love it as they love coraline
Awesome! 😀 Thank you for sharing a photo, I love it! Coraline twins, haha! 😀 That head piece goes in between the front and back, but like you said – it works without too. Love the pink fabric you’ve used for the top – looks so cosy!
I didnt have any stripey so used outgrown joggers of kids and glad i used stretchy material makes it much easier getting it on
I wont lie it was hell turning stuff inside out ie arms legs but altho it’s nowhere near as good as urs im quite pleased with myself lol
Btw i still dont get where that puece goes i got friends to help but was none the wiser im not experienced lol
I was wondering if you make and sell the Coraline doll ? it looks awesome and my daughters name is Coraline I would love to get her this doll but I do no sew …. at all ! so please let me know if you can make one and what the cost would be. My email is Dbadolato55@gmail.com thank you ..
Oh was there any response to this as i hav to machine and wud hav to hand stitch
My sincerest apologies for taking so long to reply – your comment got missed. I’m afraid I don’t have the time just now to make dolls, but I hope you give the pattern a go – it would work being hand sewn too!
I am unable to print the shirt, jeans, boot and raincoat patterns. My printer says it cannot convert the postscript file. I was able to print the doll pattern so I can get started on that. Any way you could perhaps mail me the files so I can make the clothes. I am in the US and need the doll for a Halloween costume for my granddaughter.
Thanks, Pat
Many thanks for your comment – I’ve just sent the files off to the email address you commented with.
My little sister’s love Coraline and they love sewing too, so I will show them this and they will run off and try doing it!!!
Awesome – I’d love to see a photo of the final product if they do make it! 🙂
wow this is amazing, my daughter loves Coraline
Thanks Kris 🙂
Thanks – I’m quite fond of the character too! The book is fantastic!
Is there any way you could make me one and sell me it please my baby loves it and I can’t sew to save my life x
Aw, I’m really sorry, but I haven’t got the time just now to make one! You should give it a try yourself, you might surprise yourself!! xx
Thank you so much for uploading your pattern, I can’t wait to make my doll too!
I just wanted to ask you a question: what kind of fabric did you use to make her raincoat?
It was a vinyl coated fabric I found at our local charity shop, not sure what it’s properly called, I’m afraid. Do share a photo when you’re done, I’d love to see her.
Here she is! I wanted to use vinyl fabric too, it’s a pity I couldn’t find it.. I’m satisfied with how it turned out anyways!
http://tinypic.com/r/153wvus/9
She’s adorable! Love the eyes, and that you’ve drawn on the face too. It really works, thank you for sharing! 🙂
Thank you so much for sharing this. I have been searching and searching for a doll pattern that I can adapt to a character my daughter loves called “Megamort” from an episode of Mickey Mouse Clubhouse. She is obsessed with him and I want to give it to her for Christmas. This is the first pattern I have found online that I think I can attempt to make look like him 🙂 I have never sewn a doll before, but since she is only two I hope she is happy with it however it turns out. Any advice you might have for how I could make the face shape look like his…here is a link for what he looks like…
http://static3.wikia.nocookie.net/__cb20131024015820/disney/images/a/a9/MegaMort14_KJBat.jpg
If you don’t have time to respond I totally understand, but thank you again for sharing this!
Apologies for the delay in replying! I missed your comment 🙁 Did you ever make the doll? MegaMort looks like a tricky headshape, that’s for sure! I’d love to see the final product if you did attempt it 🙂
Such a special gift for your daughter. You have many talents.
Aw thanks Sally! 🙂
She is delightful 🙂
Thanks you 🙂
I’m no seamstress, so out of my league, but that is one amazing doll!
Thanks Sarah 🙂 Have you ever tried sewing? You’ll never know unless you try! If I can do it anyone can!
This is gorgeous! My daughter would love it! Thanks for sharing this!
Aw, thanks! 🙂
Sew, so cute and my little girl would love one of these. Not sure if it is just me but none of the links are working.
Oh bother! I’ve changed the GoogleDocs settings to public so it should work now. I wonder why it didn’t open when I had the settings to link only….. can you let me know if it works for you now?